


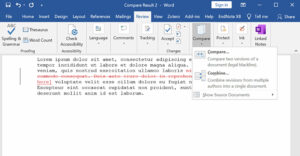
Navigating Precision: A Comprehensive Guide on Comparing Document Text Using Windows 10
Introduction: In the realm of document management and collaboration, the ability to compare text across multiple versions is a crucial...
 How to Find International Clients Who Pay in Stablecoins: A Freelancer’s Guide to Crypto Payments
  Managing “Scope Creep” in the Age of AI: How to Price Freelance Services When Tools Make Work Faster
  How to Set Up a “Local-First” Freelance Portfolio Using Obsidian and Quartz for Maximum Speed
  The Best Upwork Niches for 2026: Why Cybersecurity Consulting is the New High-Paying Frontier
  How to Use “Agentic AI” to Automate Your Freelance Client Onboarding and Project Management
 Introduction: In the realm of document management and collaboration, the ability to compare text across multiple versions is a crucial...

Introduction: In the ever-evolving digital landscape, visual aesthetics play a crucial role in user experience, and font rendering is at...

Introduction: The intersection of artificial intelligence (AI) and freelancing is reshaping the landscape of work, offering unprecedented opportunities and challenges...

Introduction: In the dynamic and ever-evolving field of design, the traditional boundaries of employment are shifting, providing unique opportunities for...
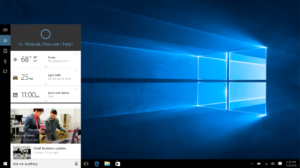
Introduction: Microsoft Edge, the innovative web browser from Microsoft, introduces an exciting integration with Cortana, Microsoft's intelligent virtual assistant. This...
Introduction: In the vast expanse of digital information, finding specific files on your Windows 10 device can be a daunting...

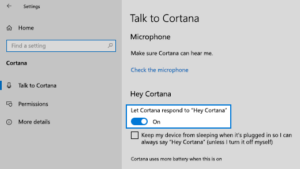
Introduction: In the era of seamless digital communication, Cortana, Microsoft's virtual assistant, emerges as a powerful tool for streamlining tasks...