


Navigating the Trials of Rendering Errors in Adobe After Effects: Strategies, Solutions, and Troubleshooting
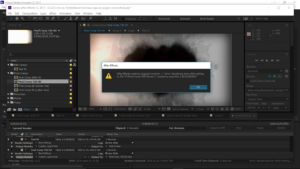
Rendering errors in Adobe After Effects can be a frustrating hurdle for users seeking to bring their creative visions to...
 The Best Ergonomic Home Office Setup for Freelancers: Reducing Neck Pain and Eye Strain for Long Sessions
  How to Find International Clients Who Pay in Stablecoins: A Freelancer’s Guide to Crypto Payments
  Managing “Scope Creep” in the Age of AI: How to Price Freelance Services When Tools Make Work Faster
  How to Set Up a “Local-First” Freelance Portfolio Using Obsidian and Quartz for Maximum Speed
  The Best Upwork Niches for 2026: Why Cybersecurity Consulting is the New High-Paying Frontier
 Rendering errors in Adobe After Effects can be a frustrating hurdle for users seeking to bring their creative visions to...

Introduction: Photoshop, the industry-standard software for digital image editing and manipulation, offers a plethora of tools and features to unleash...

Introduction: In the world of digital photography, RAW camera files are prized for their uncompressed and unprocessed nature, offering photographers...

Introduction: In the digital age, cloud storage solutions like Google Drive have revolutionized the way we manage and access our...

Introduction: In the vast digital landscape of creativity, the Remix 3D Community stands out as a vibrant hub where artists,...
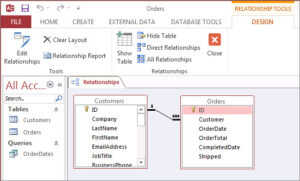
Introduction: Microsoft Access 2016 is a powerful database management system that empowers users to organize, manage, and analyze large volumes...
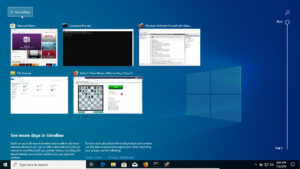
In the fast-paced world of modern computing, the ability to multitask efficiently is crucial for productivity and efficiency. Windows 10...