


Achieving Perfect Harmony: A Comprehensive Guide to Syncing Audio and Video Clips in DaVinci Resolve
Introduction: In video production, the synchronization of audio and video clips is crucial for creating a seamless viewing experience. Whether...
 How to Use “Claude Code” to Build Custom Software Tools for Your Freelance Clients Without a CS Degree
  The Best Ergonomic Home Office Setup for Freelancers: Reducing Neck Pain and Eye Strain for Long Sessions
  How to Find International Clients Who Pay in Stablecoins: A Freelancer’s Guide to Crypto Payments
  Managing “Scope Creep” in the Age of AI: How to Price Freelance Services When Tools Make Work Faster
  How to Set Up a “Local-First” Freelance Portfolio Using Obsidian and Quartz for Maximum Speed
 Introduction: In video production, the synchronization of audio and video clips is crucial for creating a seamless viewing experience. Whether...
Introduction: Voiceovers play a pivotal role in video production, providing narration, commentary, and dialogue that guide viewers through the visual...
Introduction: The soundtrack of a video is often as essential as its visuals. It sets the mood, enhances emotions, and...
Introduction: Mixing audio is an art form that plays a crucial role in creating a captivating and immersive audiovisual experience....
Introduction: Automation is a powerful tool in audio production, allowing editors and engineers to dynamically control various parameters of their...
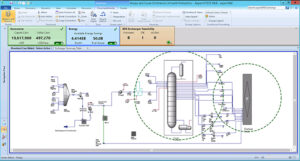
Introduction: Aspen HYSYS is a leading process simulation software used extensively in the chemical, petrochemical, and oil and gas industries...

Introduction: Swift has emerged as a powerful and versatile programming language for macOS development, offering developers the tools and capabilities...