


AirPods Expert 2 Hearing Wellbeing Elements Active
The Apple AirPods Expert 2 hearing wellbeing highlights are at last live. This is the way to getting to the...
 How to Use “Claude Code” to Build Custom Software Tools for Your Freelance Clients Without a CS Degree
  The Best Ergonomic Home Office Setup for Freelancers: Reducing Neck Pain and Eye Strain for Long Sessions
  How to Find International Clients Who Pay in Stablecoins: A Freelancer’s Guide to Crypto Payments
  Managing “Scope Creep” in the Age of AI: How to Price Freelance Services When Tools Make Work Faster
  How to Set Up a “Local-First” Freelance Portfolio Using Obsidian and Quartz for Maximum Speed
 The Apple AirPods Expert 2 hearing wellbeing highlights are at last live. This is the way to getting to the...
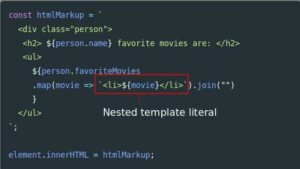
JavaScript is a versatile language that has evolved significantly over the years. One of the notable features introduced in ECMAScript...
JavaScript is a powerful, versatile programming language widely used in web development. One of its fundamental features is its ability...

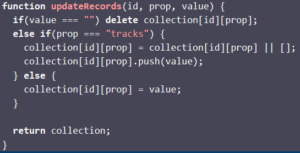
Understanding Objects in JavaScript JavaScript, a dynamic language, relies heavily on objects. They are essentially collections of key-value pairs, where...
Unit testing is a critical part of the software development lifecycle, ensuring that individual components of a program work as...
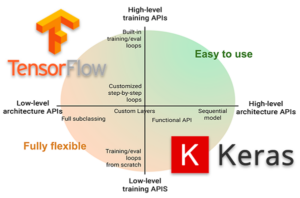
Keras is a high-level neural networks API, written in Python and capable of running on top of other deep learning...
Introduction to TensorFlow TensorFlow is an open-source platform for machine learning and artificial intelligence developed by Google. It provides a...