How to Set Up a “Private Cloud” at Home Using TrueNAS: Bypassing Subscription Fees for Good
How to Set Up a "Private Cloud" at Home Using TrueNAS: Bypassing Subscription Fees for Good However, over time, these...
Learn About Technology
How to Set Up a "Private Cloud" at Home Using TrueNAS: Bypassing Subscription Fees for Good However, over time, these...

The Guide to "Green IT": How to Reduce Your Company’s Server Energy Consumption and Carbon Footprint A large amount of...
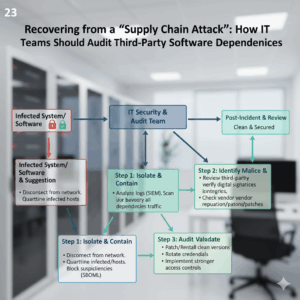
Recovering from a "Supply Chain Attack": How IT Teams Should Audit Third-Party Software Dependencies Attacks on supply chains have emerged...
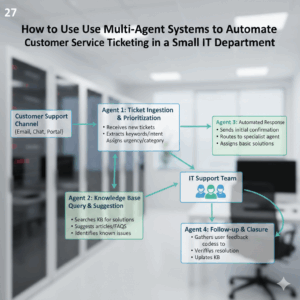
How to Use "Multi-Agent Systems" to Automate Customer Service Ticketing in a Small IT Department It might be difficult for...

The Best IT Practices for Managing a "Bring Your Own Device" (BYOD) Policy in 2026 The adoption of Bring Your...

How to Fix the "Dependency Hell" in Python Environments Using Docker and Dev Containers Since the beginning of time, the...
A Small Business Guide to Setting Up "Confidential Computing" to Protect Sensitive Customer Data The safeguarding of sensitive client information...