
Unleashing Creative Potential: A Comprehensive Guide to Applying Bitmap Effects in CorelDRAW
Introduction: CorelDRAW stands as a pinnacle of creativity and innovation in the realm of graphic design software, offering a plethora...
Introduction: CorelDRAW stands as a pinnacle of creativity and innovation in the realm of graphic design software, offering a plethora...

Introduction: CorelDRAW stands as a cornerstone in the realm of graphic design software, celebrated for its versatility, user-friendly interface, and...

Introduction: CorelDRAW, a versatile and powerful vector graphics software, empowers users to create stunning designs and illustrations with its extensive...

In the realm of digital image editing, mastering the art of realism can transform ordinary photographs into stunning works of...
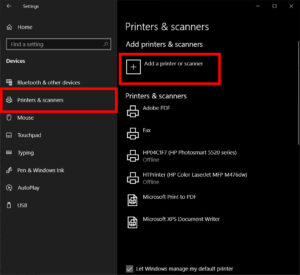
In today's digital age, the ability to seamlessly connect and integrate various devices is essential for productivity and efficiency. Printing...

In the realm of photography and digital editing, adding a spotlight behind your subject can elevate the visual impact of...
In today's interconnected world, communication knows no bounds. Whether you're writing a formal document, crafting an email, or chatting with...