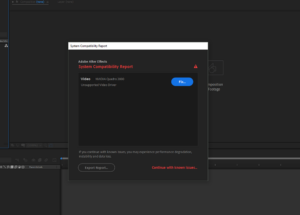
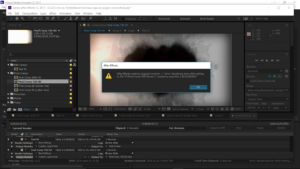
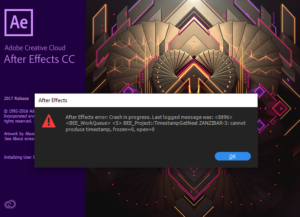
• Skip to primary navigation
  • Skip to main content

OceanofAPK

We Design Website For You

  • Home
  • Search
  • Apps Categories
  • Games Categories

Emily

Freelancer’s Blueprint: Navigating the Gig Economy

February 11, 2024 by Emily

Introduction:

In the ever-evolving landscape of work, the rise of the gig economy has ushered in a new era of freelancing, offering individuals the opportunity to chart their own professional destinies. “Freelancer’s Blueprint: Navigating the Gig Economy” serves as a comprehensive guide for those embarking on the journey of freelancing, providing insights, strategies, and invaluable advice to navigate the intricacies of this dynamic and ever-expanding realm.

Section 1: The Gig Economy Revolution

Rise of Freelancing:

The gig economy has redefined the traditional notions of employment, with freelancers now contributing significantly to the global workforce. “Freelancer’s Blueprint” begins by exploring the roots of the gig economy and its transformative impact on the way people work, showcasing the flexibility and autonomy it offers to those seeking alternative career paths.

Diverse Freelance Opportunities:

One of the key facets of the gig economy is its diversity. From graphic design and writing to programming and virtual assistance, freelancers find opportunities across a spectrum of industries. This section delves into the myriad freelance opportunities available, illustrating the breadth of options for individuals with varied skill sets.

Section 2: Building a Strong Foundation

Self-Assessment and Skill Identification:

The blueprint emphasizes the importance of self-assessment, guiding readers to identify their strengths, skills, and passions. Understanding one’s unique value proposition is a crucial first step towards establishing a solid foundation for a successful freelancing career.

Setting Clear Goals:

Successful freelancers are goal-oriented. “Freelancer’s Blueprint” walks readers through the process of setting clear, achievable goals, whether financial, professional, or personal. By establishing a roadmap, freelancers can navigate the gig economy with purpose and direction.

Section 3: Crafting an Irresistible Freelancer Profile

Optimal Online Presence:

In the digital age, a freelancer’s online presence is paramount. This section explores the art of creating a compelling freelancer profile on platforms like Upwork, Fiverr, or LinkedIn. From a captivating bio to a portfolio that showcases skills, each element is dissected to ensure freelancers stand out in a competitive marketplace.

Leveraging Social Media:

Beyond dedicated freelancing platforms, social media plays a crucial role in establishing a personal brand. “Freelancer’s Blueprint” delves into strategies for leveraging platforms like Twitter, Instagram, and Facebook to expand professional networks, showcase expertise, and attract potential clients.

Section 4: Navigating the Gig Economy Platforms

Mastering Freelance Platforms:

While the gig economy provides a plethora of opportunities, understanding how to navigate platforms is essential. This section offers a detailed exploration of popular freelancing platforms, providing tips on bidding, client communication, and project management to maximize success.

Managing Workload and Client Relationships:

“Freelancer’s Blueprint” delves into the intricacies of managing multiple projects and cultivating positive client relationships. From setting clear expectations to effective communication, freelancers will gain insights into fostering long-term, mutually beneficial partnerships.

Section 5: Financial Management and Scaling

Budgeting and Income Streams:

Financial acumen is a cornerstone of freelancing success. This section guides freelancers in creating a budget, managing income, and exploring multiple revenue streams. It offers practical advice on handling variable income, planning for taxes, and establishing financial stability.

Scaling the Freelance Business:

For freelancers aspiring to scale their businesses, this blueprint provides strategic approaches to growth. From hiring virtual assistants to exploring niche markets, readers will discover methods to expand their freelance enterprises while maintaining efficiency and quality.

Section 6: Navigating Challenges and Overcoming Burnout

Addressing Freelancer Burnout:

Freelancing, while rewarding, can sometimes lead to burnout. “Freelancer’s Blueprint” tackles the challenges of balancing workload, maintaining work-life harmony, and recognizing signs of burnout. Practical strategies for self-care and stress management are presented to help freelancers navigate the demanding aspects of their careers.

Handling Client Conflicts:

Conflicts with clients are inevitable in the freelancing world. This section provides guidance on effective communication, conflict resolution, and setting boundaries to maintain professionalism and positive client relationships.

Section 7: Future-Proofing Your Freelance Career

Staying Relevant in a Changing Landscape:

The gig economy is continuously evolving, influenced by technological advancements and shifting market demands. “Freelancer’s Blueprint” explores strategies for staying relevant, upskilling, and adapting to emerging trends to ensure a sustainable and enduring freelance career.

Cultivating a Freelance Community:

Freelancers thrive when connected with like-minded individuals. This section emphasizes the importance of building a supportive freelance community, whether through networking events, online forums, or collaborative projects. Community engagement fosters learning, inspiration, and potential collaborations that can elevate a freelancer’s career.

Section 8: Legal Considerations and Professional Development

Freelancer Legalities:

Navigating legal aspects is a crucial component of freelancing. “Freelancer’s Blueprint” outlines key legal considerations, from contract negotiations and intellectual property rights to setting fair pricing and protecting oneself from potential legal pitfalls.

Continuous Professional Development:

Freelancers must embrace a mindset of continuous learning. This section explores avenues for professional development, from online courses and workshops to attending industry conferences. Staying abreast of industry trends ensures freelancers remain competitive and capable of delivering high-quality work.

Section 9: Testimonials and Building a Stellar Reputation

Cultivating Positive Testimonials:

Client testimonials are invaluable in establishing credibility. “Freelancer’s Blueprint” provides insights into soliciting and showcasing testimonials effectively, building a reputation that attracts new clients and fosters trust within the freelance community.

Reputation Management:

Maintaining a stellar reputation is an ongoing process. This section addresses strategies for managing online reviews, handling negative feedback, and cultivating a positive professional image that resonates with clients and peers.

Section 10: The Future of Freelancing

Emerging Trends:

As the gig economy evolves, so do the trends shaping freelancing. “Freelancer’s Blueprint” explores emerging themes such as remote work, gig marketplaces, and the impact of artificial intelligence on freelancing. Understanding these trends allows freelancers to proactively adapt to the changing landscape.

Beyond Freelancing: Entrepreneurial Paths:

For freelancers considering entrepreneurial ventures, this section provides a glimpse into transitioning from freelancing to entrepreneurship. Whether launching a consultancy or creating digital products, readers will gain insights into expanding their professional horizons.

Section 11: Recommendations and Community Engagement

Recommended Resources:

“Freelancer’s Blueprint” concludes with a curated list of recommended resources. From books and podcasts to online communities and tools, freelancers will find a wealth of information to enhance their skills, stay informed, and connect with fellow professionals.

Engaging with the Freelance Community:

Readers are encouraged to actively engage with the freelance community. Whether through local meet-ups, online forums, or participating in collaborative projects, community engagement fosters a supportive network that can contribute to ongoing professional success.

Section 12: Conclusion

Empowering Freelancers:

“Freelancer’s Blueprint: Navigating the Gig Economy” serves as a beacon for freelancers navigating the vast and exciting terrain of the gig economy. Empowering individuals with knowledge, strategies, and a supportive community, this comprehensive blueprint equips freelancers to not only survive but thrive in the ever-evolving world of freelancing. As the gig economy continues to redefine how we work, this blueprint provides a roadmap for freelancers to confidently navigate the challenges and seize the boundless opportunities that lie ahead.

Mastering Visual Harmony: Placing an Image in Text with Photoshop CC and CS6

February 9, 2024 by Emily

Introduction:

In the ever-evolving landscape of digital design, Adobe Photoshop remains the go-to platform for unleashing creative potential. One captivating technique that seamlessly merges text and imagery is the art of placing an image within text. This comprehensive guide will walk you through the step-by-step process, covering both Photoshop CC and CS6, to empower you with the skills to seamlessly integrate images into text for visually striking and dynamic designs.

Setting the Canvas:

Before embarking on the journey of placing an image in text, create a new document in Photoshop. The dimensions of the canvas will depend on your project requirements, so consider factors such as intended use, resolution, and design preferences. A well-chosen canvas provides a solid foundation for your creative endeavor.

Choosing the Right Font:

Font selection is a pivotal element in successful typography-based designs. Choose a font that complements your project’s theme and enhances the overall visual harmony. Experiment with different typefaces, sizes, and styles to find the perfect balance that aligns with your creative vision.

Adding Text to the Canvas:

Activate the Text tool from the toolbar, click on the canvas, and type the desired text. Position the text according to your design preferences, and choose a color that contrasts well with the image you plan to incorporate. Once satisfied with the text, rasterize the layer to enable image placement within it.

Importing the Image:

Select the image you wish to place within the text and open it in Photoshop. Using the Move tool, drag the image onto the canvas containing the text. Position the image layer above the text layer in the Layers panel. This layer arrangement is crucial for achieving the desired visual effect.

Clipping Mask in Photoshop CC:

For users working with Photoshop CC, creating a clipping mask is a straightforward process. Right-click on the image layer in the Layers panel and choose “Create Clipping Mask.” The image will now be confined within the contours of the text, seamlessly integrating the two elements.

Clipping Mask in Photoshop CS6:

In Photoshop CS6, the process is slightly different but equally effective. Hold down the Alt key (Option key on Mac) and position the cursor between the text layer and the image layer in the Layers panel. Click when you see the cursor change to an overlapping square icon. This action creates a clipping mask, confining the image within the text boundaries.

Adjusting Image Placement:

Fine-tune the placement and size of the image within the text to achieve the desired visual impact. Use the Transform controls (Ctrl+T or Command+T) to resize, rotate, or reposition the image. Experiment with different adjustments until you find the arrangement that enhances the overall composition.

Refining Edges for Seamless Integration:

To ensure a seamless integration of the image and text, refine the edges of the image layer. Use tools like the Eraser tool or Layer Mask to clean up any stray pixels and achieve a polished appearance. Pay attention to details, especially around the contours of the text.

Adding Depth with Layer Styles:

Elevate the visual appeal of the integrated image and text by applying layer styles. Double-click on the text layer to access the Layer Style panel. Experiment with options like Drop Shadow, Inner Shadow, and Bevel and Emboss to introduce depth and dimension. Layer styles enhance the overall aesthetic and contribute to the visual cohesion of the design.

Experimenting with Blend Modes:

Explore blend modes to create intriguing interactions between the text and the integrated image. Blending modes determine how layers interact with each other, offering a range of visual effects. Experiment with modes like Multiply, Overlay, or Screen to discover unique combinations that enhance the overall design.

Saving and Exporting:

Once satisfied with your design, it’s time to save and share your creation. Save the Photoshop (.PSD) file to retain all layers, styles, and editability. For sharing or use in other projects, export your design as a high-quality image file (.JPEG, .PNG) with a transparent background if desired.

Conclusion:

The process of placing an image in text with Photoshop CC and CS6 unlocks a realm of creative possibilities where typography and imagery seamlessly converge. Whether you’re designing eye-catching posters, engaging social media graphics, or captivating digital art, this technique offers a versatile tool for visual storytelling.

So, dive into the world of integrated text and images, experiment with clipping masks and layer styles, and watch as your typographic designs come to life with a harmonious blend of text and imagery. With Photoshop CC and CS6 as your creative companions, the fusion of text and images becomes a testament to the boundless potential of digital design.

Radiant Mastery: Creating a Colorful Light Burst Text Effect with Photoshop CS6

February 9, 2024 by Emily

Introduction:

In the expansive realm of graphic design, Adobe Photoshop CS6 remains a powerhouse, offering a spectrum of tools and techniques to bring creativity to life. Among the myriad possibilities, the creation of a Colorful Light Burst Text Effect stands out as a captivating way to infuse energy and vibrancy into typographic designs. This comprehensive guide will lead you through the step-by-step process, unlocking the secrets of Photoshop CS6 to craft a radiant and dynamic text effect that bursts with color and luminosity.

Setting the Stage:

Before diving into the creation of the Colorful Light Burst Text Effect, set the stage by opening Photoshop CS6 and creating a new document. Choose dimensions that suit your project, considering factors like intended use, resolution, and design preferences. A larger canvas might be preferred for intricate details, while a smaller one can enhance a minimalist approach.

Choosing the Right Font:

Font selection is a critical element of any typographic design. Pick a font that aligns with your project’s theme and overall aesthetic. Consider factors such as readability, style, and the compatibility of the font with the vibrant light burst effect you intend to create. Whether it’s a bold sans-serif or an elegant script, the font sets the tone for your design.

Adding Text to the Canvas:

Activate the Text tool from the toolbar, click on the canvas, and type the desired text. Experiment with font size, color, and positioning until you achieve the initial look for your text. Once satisfied, rasterize the text layer to enable the application of dynamic effects.

Creating the Base Light Burst:

The foundation of the Colorful Light Burst Text Effect begins with the creation of a base light burst. Create a new layer above the text layer and use the Elliptical Marquee tool to draw a circular selection. Fill this selection with a vibrant color of your choice. Apply a Gaussian Blur to soften the edges of the circle, creating a radiant glow. Set the layer blending mode to Screen to allow the burst to interact with the text below.

Duplicating and Expanding:

To enhance the dynamic quality of the light burst, duplicate the base burst layer and resize each duplicate, varying the size and positioning. Experiment with different colors for each duplicate to introduce a spectrum of hues. This layering and duplication process adds depth and complexity to the overall burst effect.

Applying Layer Styles:

Elevate the luminosity and color vibrancy by applying layer styles to the text layer. Double-click on the text layer to access the Layer Style panel. Experiment with options such as Outer Glow, Inner Glow, and Color Overlay. Adjust settings like opacity, size, and blend modes to tailor the layer styles to complement the light burst effect.

Incorporating Custom Patterns:

For a unique and personalized touch, consider incorporating custom patterns into the Colorful Light Burst Text Effect. Create a new layer and apply patterns using the Pattern Overlay option in the Layer Style panel. Experiment with different patterns to add texture and visual interest to the burst effect, creating a mesmerizing interplay of light and patterns.

Adding Light Rays:

Enhance the dynamic radiance of the light burst by adding light rays emanating from the text. Create new layers and use the Line tool to draw rays extending outward from the text. Apply a Gaussian Blur to soften the rays and set the layer blending mode to Screen for a luminous effect. Experiment with different lengths and angles to achieve a dynamic burst of light.

Fine-Tuning and Detailing:

Achieve precision by fine-tuning the Colorful Light Burst Text Effect. Use the Eraser tool to refine edges, adjust layer opacities for subtle variations, and experiment with additional layer styles or patterns to add intricate details. The meticulous attention to detail enhances the overall visual impact of the design.

Experimenting with Blending Modes:

Explore blending modes to further enhance the interaction between the text, light burst, and additional elements. Experiment with modes like Color Dodge, Linear Dodge (Add), or Overlay to achieve captivating color interactions and luminosity. Blending modes provide a playground for artistic experimentation, allowing you to discover unexpected and visually stunning results.

Saving and Exporting:

Once satisfied with your creation, it’s time to save and share the Colorful Light Burst Text Effect. Save the Photoshop (.PSD) file to retain all layers, styles, and editability. For sharing or use in other projects, export your design as a high-quality image file (.JPEG, .PNG) with a transparent background if desired.

Conclusion:

Crafting a Colorful Light Burst Text Effect with Photoshop CS6 is an exhilarating journey through the intersection of typography and vibrant visual elements. The strategic use of light bursts, layer styles, and custom patterns transforms a simple text into a radiant and dynamic design piece. Whether you’re creating eye-catching posters, social media graphics, or digital art, this technique offers boundless creative possibilities.

So, dive into the world of Colorful Light Burst Text Effects, experiment with layer styles and patterns, and watch as your typographic design comes alive with luminosity and energy. In the hands of Photoshop CS6, the fusion of radiant light bursts and vibrant text becomes a testament to the limitless potential of digital design.

Mastering Precision: Crafting Multiple Text Strokes with Smart Objects in Photoshop

February 9, 2024 by Emily

Introduction:

In the dynamic world of digital design, Adobe Photoshop stands as an unrivaled platform for pushing creative boundaries. Among the myriad techniques at your disposal, the art of applying multiple text strokes with Smart Objects offers a level of precision and versatility that elevates typographic design to new heights. In this extensive guide, we will delve into the step-by-step process of creating multiple text strokes, leveraging the power of Smart Objects to achieve nuanced and customizable results.

Establishing the Canvas:

Before embarking on the journey of multiple text strokes, set the stage by creating a new document in Photoshop. Determine the dimensions and resolution based on the intended purpose of your design, ensuring a canvas that accommodates your creative vision.

Choosing the Right Fonts:

Font selection plays a pivotal role in typographic design. Choose fonts that resonate with your design aesthetic and convey the intended message. Experiment with different typefaces, sizes, and styles to find the perfect combination for your multiple text strokes.

Adding Text Layers:

Activate the Text tool from the toolbar, click on the canvas, and type the desired text. Repeat this process for each distinct text layer you plan to incorporate in your design. Each text layer will serve as a foundation for a different stroke, providing flexibility and control over the final outcome.

Smart Object Conversion:

To unleash the power of Smart Objects, convert each text layer individually. Right-click on the text layer in the Layers panel, and select “Convert to Smart Object.” This step is crucial for maintaining editability and flexibility throughout the design process.

Applying the First Stroke:

With the Smart Objects in place, it’s time to apply the first stroke. Double-click on the Smart Object layer to access the Layer Style panel. Navigate to the Stroke option, adjust parameters such as size, position, and color to create the initial stroke effect. This stroke will serve as the base for subsequent layers.

Duplicating Smart Objects:

To achieve multiple text strokes, duplicate the Smart Object layer for each additional stroke you wish to apply. Right-click on the Smart Object layer, select “Duplicate Layer,” and position the duplicated layer above the original. Repeat this process for each subsequent stroke, creating a layer stack that represents the cumulative effect of multiple strokes.

Customizing Stroke Attributes:

Each duplicated Smart Object layer offers an opportunity to customize stroke attributes. Double-click on the Stroke option within the Layer Style panel for the duplicated layer, allowing you to modify parameters such as size, position, color, and opacity. This iterative process enables you to craft a layered and dynamic visual impact with your multiple text strokes.

Layer Styles for Complexity:

Explore additional layer styles to enhance the complexity of your multiple text strokes. Experiment with options such as Drop Shadow, Inner Shadow, and Outer Glow to introduce nuanced detailing. Layer styles contribute to the overall visual depth and add a layer of sophistication to your typographic design.

Dynamic Editing with Smart Objects:

One of the key advantages of Smart Objects is the ability to make dynamic edits while preserving the original text and styling. Double-click on any Smart Object layer to access the embedded contents. Adjust the text, stroke attributes, or even apply additional layer styles. The changes will automatically reflect across all duplicated Smart Object layers, ensuring a streamlined editing process.

Experimenting with Blend Modes:

Enhance the visual cohesion of your multiple text strokes by experimenting with blend modes. Blend modes dictate how layers interact with each other, offering a range of visual effects. Try modes such as Multiply, Overlay, or Screen to discover unique combinations that enhance the overall design aesthetic.

Incorporating Gradients and Textures:

For an added layer of sophistication, consider incorporating gradients or textures into your multiple text strokes. Apply Gradient Overlay within the Layer Style panel to introduce gradient effects, or experiment with textured patterns for a tactile dimension. These subtle touches contribute to the overall richness of your typographic design.

Saving and Exporting:

Once satisfied with your design, it’s time to save and share your creation. Save the Photoshop (.PSD) file to retain all layers, styles, and editability. For sharing or use in other projects, export your design as a high-quality image file (.JPEG, .PNG) while preserving transparency if necessary.

Conclusion:

Crafting multiple text strokes with Smart Objects in Photoshop is an artistic journey that combines precision with creative freedom. By leveraging the versatility of Smart Objects, you can achieve nuanced and customizable results, creating typographic designs that stand out with layered complexity. Whether you’re designing logos, posters, or digital graphics, the ability to apply multiple text strokes provides a toolkit for creating visually engaging and dynamic compositions.

So, venture into the realm of multiple text strokes, experiment with Smart Objects and layer styles, and let your creativity flourish. In the vast landscape of digital design, mastering the art of multiple text strokes with Smart Objects opens the door to a world where precision meets boundless creative expression.

Mastering Elegance: Creating Editable Blurred Type with Layer Styles in Photoshop

February 9, 2024 by Emily

Introduction:

In the realm of digital design, blending creativity with functionality is an art form, and Adobe Photoshop stands as the ultimate canvas for such endeavors. One enchanting technique that effortlessly merges sophistication with versatility is the creation of editable blurred type using layer styles. In this comprehensive guide, we’ll unravel the step-by-step process, exploring layer styles, customization options, and creative applications that elevate your typographic designs to new heights.

Setting the Stage:

Before delving into the intricacies of editable blurred type, establish your canvas. Open Photoshop, create a new document, and set dimensions that align with your design intent. The choice of canvas size depends on factors like the intended platform, resolution, and overall design aesthetic.

Choosing the Right Font:

Font selection plays a pivotal role in typographic design. Choose a font that complements your project’s theme, ensuring readability and aesthetic harmony. Whether it’s a sleek sans-serif for a modern look or an ornate script for a touch of elegance, the font sets the tone for your editable blurred type.

Adding Text to the Canvas:

Activate the Text tool from the toolbar, click on the canvas, and type the desired text. Experiment with font size, color, and alignment to achieve the initial look for your editable text. Once satisfied, convert the text layer to a Smart Object. This step preserves the text’s editability and allows for non-destructive application of layer styles.

Applying the Gaussian Blur:

The magic begins with the application of the Gaussian Blur. Select the Smart Object layer, navigate to the Filter menu, choose Blur, and then Gaussian Blur. Adjust the radius until you achieve the desired level of blurriness. This step introduces a soft, elegant blur to the text while maintaining its editable nature through the Smart Object.

Layer Styles for Elegance:

Now comes the transformative application of layer styles to infuse your editable blurred type with elegance. Double-click on the Smart Object layer to access the Layer Style panel. Here, explore various options to tailor the appearance of your text:

Drop Shadow:

Enhance the three-dimensional quality of your editable text by adding a subtle drop shadow. Adjust settings such as opacity, distance, and size to achieve the desired shadow effect, providing depth and sophistication.

Outer Glow:

Introduce a soft, luminous halo around your editable text using the Outer Glow layer style. Experiment with opacity, size, and color to create a gentle glow that adds a touch of ethereality to the blurred type.

Stroke:

For a refined border that defines your editable text, utilize the Stroke layer style. Adjust parameters like size, position, and color to customize the stroke appearance. This subtle outlining enhances the visibility and elegance of your text.

Color Overlay:

Transform the color of your editable blurred type with the Color Overlay layer style. Choose a hue that complements your overall design or experiment with gradient overlays to add visual interest. This layer style allows for versatile color customization.

Satin:

Introduce a silky, reflective sheen to your editable text using the Satin layer style. Adjust settings such as distance, size, and contour to control the satin effect. This layer style imparts a luxurious quality to the blurred type.

Dynamic Adjustments with Smart Filters:

One of the advantages of using Smart Objects is the ability to make dynamic adjustments even after applying filters. Revisit the Gaussian Blur settings or fine-tune layer styles by double-clicking on the Smart Object layer. This flexibility ensures that your editable blurred type remains responsive to your design vision.

Experimenting with Blend Modes:

Elevate your typographic design by experimenting with blend modes. Blend your editable blurred type seamlessly with the background or other elements by toggling through modes like Multiply, Overlay, or Soft Light. This step adds an extra layer of visual sophistication to your design.

Incorporating Gradient Overlays:

For a captivating gradient effect, explore Gradient Overlay within the Layer Style panel. Apply gradients to your editable blurred type, experimenting with various color combinations and blending options. Gradient overlays introduce depth and dimension, enhancing the overall aesthetic.

Saving and Exporting:

Once satisfied with your masterpiece of editable blurred type, it’s time to save and share your creation. Save the Photoshop (.PSD) file to retain all layers and editability. For sharing or use in other projects, export your design as a high-quality image file (.JPEG, .PNG) while preserving transparency if necessary.

Conclusion:

Creating editable blurred type with layer styles in Photoshop is an artistic journey that seamlessly combines elegance with practicality. Through the strategic application of Gaussian Blur, layer styles, and dynamic adjustments, you transform basic text into a visually stunning and editable design element. The interplay of shadows, glows, strokes, and color overlays adds a layer of sophistication that transcends traditional typography.

Whether you’re crafting a sleek web banner, an eye-catching poster, or a stylish social media graphic, this technique offers boundless creative possibilities. So, embark on your typographic adventure, experiment with layer styles, and watch as your editable blurred type becomes a focal point of elegance in your digital designs. In the realm of Photoshop artistry, the marriage of editable text and graceful blurring opens doors to a realm where creativity knows no bounds.

Mastering the Art: Stroke Text with a Brush in Photoshop

February 9, 2024 by Emily

Introduction:

Photoshop, the powerhouse of digital creativity, offers a myriad of tools and techniques to bring your artistic visions to life. One captivating method that combines the precision of digital design with the organic charm of hand-painted strokes is the art of stroking text with a brush. In this extensive guide, we’ll delve into the step-by-step process of stroke text creation, exploring various brush settings, customization options, and creative possibilities that Photoshop puts at your fingertips.

Setting the Canvas:

Before diving into the strokes, set the canvas to lay the foundation for your artistic endeavor. Open Photoshop, create a new document, and choose the dimensions and resolution that align with your vision. A larger canvas might be preferable for intricate details, while a smaller one can enhance a minimalist approach.

Choosing the Right Brush:

Selecting the appropriate brush lays the groundwork for the stroke text. Photoshop offers an extensive library of brushes, each with unique characteristics. Navigate to the Brush Preset Picker and experiment with different brushes to find the one that aligns with your artistic intent. Consider factors such as size, hardness, and shape dynamics to tailor the brush to your specific needs.

Customizing Brush Settings:

To truly unleash the creative potential of stroked text, delve into the Brush Settings panel. Adjust the spacing to control the distance between each brush mark, modify scattering for a more randomized effect, and explore texture options to add depth and complexity to your strokes. Tinkering with these settings allows you to fine-tune the brush to achieve the desired aesthetic.

Creating the Text:

With your canvas and brush settings in place, it’s time to add the text. Select the Text tool from the toolbar, click on the canvas, and type your desired text. Experiment with different fonts, sizes, and alignments until the text complements your artistic vision. Once satisfied, rasterize the text layer to enable brush strokes.

Stroking the Text:

Now comes the artistic flourish – stroking the text with the chosen brush. Create a new layer above the text layer, ensuring that it’s selected. Choose the Brush tool, set the foreground color to the hue you want, and start brushing over the text. The strokes will seamlessly follow the contours of the letters, creating a hand-painted effect. Experiment with stroke opacity and layer blending modes to enhance the visual impact.

Embracing Color Dynamics:

For a dynamic and vibrant outcome, explore the Color Dynamics option in the Brush Settings panel. This feature allows the brush strokes to vary in color, opacity, and saturation based on your defined parameters. By introducing color dynamics, you can infuse your stroke text with a rich, painterly quality that adds depth and interest.

Incorporating Texture:

Elevate your stroke text by incorporating texture into the brush strokes. Photoshop offers a plethora of textures and patterns that can be applied directly to the brush. Experiment with different textures to achieve effects ranging from subtle graininess to bold, textured strokes. This step not only enhances the visual appeal but also adds a tactile quality to the digital canvas.

Adding Depth with Layer Styles:

To further enhance the three-dimensional quality of your stroke text, explore the Layer Styles options. Apply effects such as Bevel and Emboss, Inner Shadow, and Gradient Overlay to introduce depth, highlights, and shadows. Layer Styles provide a versatile toolkit for refining the overall look of your stroke text, allowing you to tailor it to match your artistic vision.

Fine-Tuning and Refining:

Artistic mastery lies in the details. Take the time to fine-tune your stroke text by adjusting individual brush strokes, refining edges, and experimenting with additional brush details. Utilize the eraser tool to clean up any stray marks or refine specific areas. This meticulous approach ensures a polished and professional outcome.

Experimenting with Blending Modes:

Harness the creative potential of blending modes to introduce captivating interactions between your stroke text and the background. Experiment with modes like Overlay, Multiply, or Screen to achieve unique color interactions, luminosity effects, or intriguing text overlays. Blending modes provide a playground for artistic experimentation, allowing you to discover unexpected and visually stunning results.

Saving and Exporting:

Once satisfied with your stroke text masterpiece, it’s time to save and share your creation. Save the Photoshop (.PSD) file to preserve layers and editing capabilities. For sharing or incorporating into other projects, export your stroke text as a high-quality image file (.JPEG, .PNG) with a transparent background if desired.

Conclusion:

Mastering the art of stroke text with a brush in Photoshop is a journey of creativity, experimentation, and skill refinement. By combining the precision of digital design with the organic charm of hand-painted strokes, you unlock a realm of artistic possibilities. Whether you’re aiming for a rustic, handcrafted vibe or a bold, contemporary aesthetic, Photoshop provides the tools and flexibility to bring your stroke text visions to life. So, pick up your digital brush and let your creativity flow as you embark on the exhilarating journey of stroking text in Photoshop.

Empowering Parental Control: A Comprehensive Guide on How to Set Screen Time for Kids in Windows 10

February 7, 2024 by Emily

Introduction:

In the digital age, where technology is an integral part of daily life, ensuring a healthy balance of screen time for kids is a paramount concern for parents. Windows 10 recognizes the importance of digital well-being and offers robust parental control features, including the ability to set screen time limits. This comprehensive guide explores the intricacies of setting screen time for kids in Windows 10, empowering parents to foster a safe and balanced digital environment for their children.

I. Understanding the Need for Screen Time Limits:

  1. Promoting Healthy Habits:
    • Excessive screen time can have various impacts on children, including disrupted sleep patterns, decreased physical activity, and potential negative effects on social and academic development. Setting screen time limits fosters a healthier balance between digital engagement and other essential activities.
  2. Managing Content Exposure:
    • Beyond limiting overall screen time, parents can use these features to control the types of content children can access. This ensures age-appropriate digital experiences and protects children from potentially harmful content.

II. Configuring Family Safety Settings in Windows 10:

  1. Creating a Microsoft Family Group:
    • To utilize screen time limits, parents need to set up a Microsoft Family Group. This section guides users through the process of creating a family group, adding children to the group, and managing family settings.
  2. Adding Child Accounts:
    • Incorporating child accounts within the Microsoft Family Group is crucial for implementing screen time limits. Parents can customize settings for each child, tailoring the digital experience based on individual needs and age appropriateness.

III. Setting Screen Time Limits:

  1. Accessing Family Safety Settings:
    • Parents can set screen time limits by navigating to the Family Safety settings. This section details how to access these settings, either through the Microsoft Family website or directly on the Windows 10 device.
  2. Configuring Daily Time Allowance:
    • Windows 10 allows parents to set daily time allowances for each child. This can be customized for weekdays and weekends, providing flexibility in managing screen time based on the family’s routine.
  3. Setting App and Game Limits:
    • Beyond general screen time, parents can specify time limits for individual apps and games. This feature ensures a balanced digital experience by allowing more time for educational apps while limiting recreational or potentially addictive ones.

IV. Customizing Content Filters and Restrictions:

  1. Appropriate Content Filters:
    • Windows 10 enables parents to implement content filters, ensuring that children only have access to age-appropriate content. This section explores how to customize these filters based on the child’s age and maturity level.
  2. Web Browsing Restrictions:
    • Parents can restrict web browsing to ensure a safe online experience. This includes blocking inappropriate websites and setting browsing restrictions based on the child’s age and needs.

V. Reviewing Activity Reports:

  1. Monitoring Screen Time Usage:
    • Windows 10 provides parents with detailed activity reports, allowing them to monitor how much time their children spend on the device, the apps used, and the websites visited. This section explains how to access and interpret these reports.
  2. Receiving Weekly Email Summaries:
    • For added convenience, parents can opt to receive weekly email summaries that provide an overview of their child’s digital activity. This feature keeps parents informed without requiring them to actively check the activity reports regularly.

VI. Balancing Digital Engagement with Rewards:

  1. Setting Reward Limits:
    • To motivate positive behavior and responsible device usage, Windows 10 offers the ability to set reward limits. Parents can grant additional screen time as a reward for completing tasks or exhibiting positive behavior.
  2. Configuring Device Curfew:
    • Parents can enforce a device curfew, restricting access to devices during specified hours. This ensures that children have designated periods for other essential activities, such as homework, meals, and sleep.

VII. Troubleshooting and FAQs:

  1. Common Issues and Solutions:
    • Parents may encounter challenges while configuring or implementing screen time limits. This section provides troubleshooting tips for common issues, ensuring a smooth and effective implementation of parental controls.
  2. Frequently Asked Questions:
    • Addressing common queries and concerns, this section provides answers to frequently asked questions about setting screen time for kids in Windows 10.

VIII. Conclusion:

Setting screen time limits for kids in Windows 10 is a proactive step toward fostering a healthy and balanced digital lifestyle. This comprehensive guide has navigated the process of configuring family safety settings, setting screen time limits, and customizing content restrictions. By empowering parents with the tools to manage their children’s digital experiences, Windows 10 contributes to creating a safe and nurturing environment for the next generation of digital citizens. As technology continues to play a significant role in our lives, these features help strike a harmonious balance between the digital and physical worlds, promoting the well-being and development of children in the digital age.

  • « Go to Previous Page
  • Go to page 1
  • Interim pages omitted …
  • Go to page 42
  • Go to page 43
  • Go to page 44
  • Go to page 45
  • Go to page 46
  • Interim pages omitted …
  • Go to page 76
  • Go to Next Page »

Copyright © 2025 · Genesis Sample Theme on Genesis Framework · WordPress · Log in