
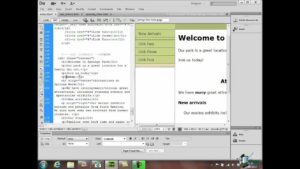
Mastering CSS Styles in Adobe Dreamweaver: Unleash the Power of Visual Design
Introduction: Cascading Style Sheets (CSS) are a cornerstone of modern web design, providing designers with powerful tools for controlling the...
Introduction: Cascading Style Sheets (CSS) are a cornerstone of modern web design, providing designers with powerful tools for controlling the...
Introduction: Text formatting is a crucial aspect of web design, influencing readability, visual appeal, and user experience. Adobe Dreamweaver, a...

Introduction: Hyperlinks are the backbone of web navigation, connecting web pages and guiding users through online content. Adobe Dreamweaver, a...

Introduction: Images are a cornerstone of web design, adding visual appeal, conveying information, and enhancing user engagement. Adobe Dreamweaver, a...

Introduction: Text plays a vital role in web design, conveying information, enhancing visual appeal, and guiding user interaction. Adobe Dreamweaver,...
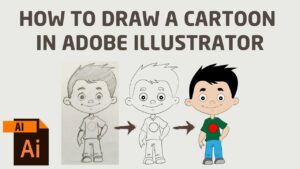
Introduction: Cartoon characters are beloved by people of all ages and have been a staple of entertainment for decades. From...

Introduction: Packaging design plays a crucial role in capturing consumer attention, communicating brand identity, and influencing purchasing decisions. Whether it's...


