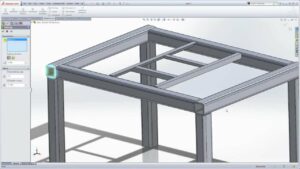
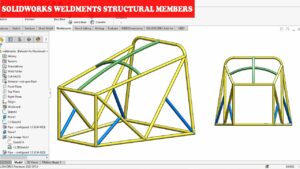
• Skip to primary navigation
  • Skip to main content

OceanofAPK

We Design Website For You

  • Home
  • Search
  • Apps Categories
  • Games Categories

Emily

Mastering Windows Task Scheduler: A Comprehensive Guide to Harnessing the Power of Task Automation in Windows 7

April 9, 2024 by Emily

In the fast-paced world of computing, efficiency and productivity are paramount. Windows Task Scheduler, a powerful built-in utility of Windows 7, empowers users to automate repetitive tasks, schedule maintenance activities, and streamline workflow processes with ease. From running backup scripts to launching applications at specific times, Task Scheduler offers a wide range of functionalities to enhance productivity and convenience. In this exhaustive guide, we will delve deep into the intricacies of Windows Task Scheduler, providing step-by-step instructions, advanced techniques, and practical examples to help you leverage its capabilities effectively.

Understanding Windows Task Scheduler in Windows 7:

Before diving into the process of using Windows Task Scheduler, let’s first grasp the concept and significance of this indispensable tool:

  1. Definition: Windows Task Scheduler is a system utility in Windows 7 that enables users to automate the execution of tasks, programs, and scripts at predefined intervals or in response to specific events.
  2. Task Automation: Task Scheduler allows users to automate a wide range of tasks, including system maintenance, software updates, file backups, and application launches, eliminating the need for manual intervention and saving time and effort.
  3. Flexibility and Customization: Task Scheduler offers a high degree of flexibility and customization, allowing users to define task triggers, set execution conditions, and specify task actions based on their specific requirements and preferences.

Accessing Windows Task Scheduler:

Now, let’s explore how to access and navigate Windows Task Scheduler in Windows 7:

  1. Accessing Task Scheduler:
    • Click on the Start button in the taskbar.
    • Open the Control Panel and navigate to the “System and Security” category.
    • Click on “Administrative Tools” and then double-click on “Task Scheduler” to launch the Task Scheduler application.
  2. Navigating Task Scheduler:
    • The Task Scheduler window provides a hierarchical view of tasks organized into folders and categories.
    • Navigate through the folders to view existing tasks, create new tasks, or modify task properties.

Using Windows Task Scheduler:

Now that we’ve accessed Task Scheduler let’s explore how to use its features and functionalities effectively:

  1. Creating a Basic Task:
    • Click on “Create Basic Task” in the Actions pane to launch the Create Basic Task Wizard.
    • Follow the wizard prompts to specify a name and description for the task, set the trigger (e.g., daily, weekly, monthly), and define the action (e.g., start a program, send an email).
  2. Creating a Custom Task:
    • Click on “Create Task” in the Actions pane to open the Create Task dialog.
    • Configure task settings such as triggers, conditions, actions, and settings in the various tabs of the Create Task dialog to create a custom task tailored to your specific requirements.
  3. Modifying Existing Tasks:
    • Double-click on an existing task in the Task Scheduler window to open its properties.
    • Modify task properties such as triggers, actions, conditions, and settings as needed to update or customize the task.
  4. Viewing Task History and Status:
    • Use the “History” tab in the Task Scheduler window to view the execution history and status of tasks.
    • Monitor task execution, view completed, failed, or missed tasks, and troubleshoot any issues that may arise.

Advanced Features and Tips:

To further enhance your experience with Windows Task Scheduler, consider the following advanced features and tips:

  1. Using Task Actions and Conditions:
    • Explore advanced task actions and conditions to create more sophisticated task workflows.
    • Use actions such as running PowerShell scripts, sending emails, or displaying messages to perform complex task operations.
  2. Managing Task Triggers:
    • Customize task triggers to launch tasks based on specific events, system startup or shutdown, user logon or logoff, or idle time.
    • Fine-tune trigger settings to optimize task execution and responsiveness.
  3. Utilizing Task Libraries and Templates:
    • Explore the built-in task libraries and templates provided by Windows Task Scheduler for common tasks and operations.
    • Use task templates as starting points for creating new tasks or managing existing tasks more efficiently.
  4. Monitoring Task Performance:
    • Use performance monitoring tools and utilities to track the resource usage and performance impact of scheduled tasks.
    • Monitor CPU, memory, disk, and network usage to ensure that scheduled tasks do not adversely affect system performance.

Conclusion:

Windows Task Scheduler is a powerful tool that empowers users to automate tasks, streamline workflow processes, and enhance productivity in Windows 7. By following the comprehensive guide outlined above, users can harness the capabilities of Task Scheduler to schedule routine tasks, automate maintenance activities, and optimize system performance with ease. Whether it’s running backup scripts, launching applications, or performing system maintenance, Task Scheduler provides users with the tools and flexibility to automate tasks efficiently and effectively. So embrace the power of task automation today, leverage Windows Task Scheduler with confidence, and unlock new possibilities for productivity and convenience in Windows 7.

Mastering Windows Firewall: A Comprehensive Guide to Enabling and Disabling Windows Firewall in Windows 7

April 9, 2024 by Emily

In the realm of cybersecurity, firewalls serve as critical barriers between your computer and potential threats from the outside world. Windows Firewall, a built-in feature of Windows 7, acts as a frontline defense mechanism, monitoring and controlling incoming and outgoing network traffic to protect your system from unauthorized access and malicious activity. Whether you need to enable Windows Firewall to safeguard your system or disable it temporarily for specific purposes, understanding the process is essential for maintaining a secure computing environment. In this exhaustive guide, we will explore the intricacies of enabling and disabling Windows Firewall in Windows 7, providing step-by-step instructions and insights into the importance of firewall protection.

Understanding Windows Firewall in Windows 7:

Before delving into the process of enabling and disabling Windows Firewall, let’s first grasp the concept and significance of Windows Firewall in Windows 7:

  1. Definition: Windows Firewall is a built-in software component of Windows 7 that monitors and filters incoming and outgoing network traffic based on predefined rules and configurations.
  2. Security Functionality: Windows Firewall acts as a barrier between your computer and external networks, blocking unauthorized access attempts and preventing potentially harmful data packets from reaching your system.
  3. Customization Options: Windows Firewall in Windows 7 offers users a range of customization options, allowing them to define specific rules for inbound and outbound traffic, configure exceptions for trusted applications, and tailor firewall settings to their security needs.

Enabling Windows Firewall in Windows 7:

Now, let’s explore the step-by-step process of enabling Windows Firewall to enhance the security of your system:

  1. Accessing Windows Firewall Settings:
    • Click on the Start button in the taskbar.
    • Open the Control Panel and navigate to the “System and Security” category.
    • Click on “Windows Firewall” to access Windows Firewall settings.
  2. Enabling Windows Firewall:
    • In the Windows Firewall window, click on the option to “Turn Windows Firewall on or off” in the left pane.
    • Select the option to turn on Windows Firewall for both public and private networks.
    • Click “OK” to apply the changes and enable Windows Firewall.
  3. Customizing Firewall Settings:
    • Explore additional settings in the Windows Firewall window to customize firewall rules, configure exceptions, and manage advanced security options.
    • Adjust settings based on your security requirements and preferences to optimize firewall protection.

Disabling Windows Firewall in Windows 7:

While Windows Firewall provides essential security protection, there may be situations where you need to disable it temporarily for specific purposes, such as troubleshooting network connectivity issues or testing application compatibility. Here’s how to disable Windows Firewall in Windows 7:

  1. Accessing Windows Firewall Settings:
    • Follow the same steps outlined above to access Windows Firewall settings through the Control Panel.
  2. Disabling Windows Firewall:
    • In the Windows Firewall window, click on the option to “Turn Windows Firewall on or off” in the left pane.
    • Select the option to turn off Windows Firewall for both public and private networks.
    • Click “OK” to apply the changes and disable Windows Firewall.
  3. Proceed with Caution:
    • Exercise caution when disabling Windows Firewall, as doing so can leave your system vulnerable to security threats and unauthorized access.
    • Disable Windows Firewall only temporarily and for specific purposes, and re-enable it as soon as the task is completed.

Advanced Features and Tips:

To further optimize the security and functionality of Windows Firewall in Windows 7, consider the following advanced features and tips:

  1. Creating Custom Firewall Rules:
    • Use the “Advanced settings” option in the Windows Firewall window to create custom firewall rules for specific applications, ports, or protocols.
    • Define inbound and outbound rules to control network traffic more granularly and enhance security.
  2. Monitoring Firewall Activity:
    • Enable logging for Windows Firewall to track firewall activity and monitor network traffic.
    • Review firewall logs regularly to identify potential security threats, suspicious activity, or unauthorized access attempts.
  3. Utilizing Third-Party Firewall Solutions:
    • Consider using third-party firewall solutions for advanced firewall protection and additional security features.
    • Explore reputable firewall software vendors to find a solution that meets your security needs and complements Windows Firewall.

Conclusion:

Windows Firewall is a vital component of Windows 7’s built-in security features, providing essential protection against network-based threats and unauthorized access. By following the comprehensive guide outlined above, users can effectively enable or disable Windows Firewall to enhance the security of their systems and protect against potential security risks. Whether it’s enabling Windows Firewall to safeguard your system or temporarily disabling it for troubleshooting purposes, understanding the process is essential for maintaining a secure computing environment in Windows 7. So take control of your system’s security today, enable or disable Windows Firewall with confidence, and enjoy peace of mind knowing that your system is protected against external threats.

Mastering Troubleshooting with the Windows XP Recovery Console

April 8, 2024 by Emily

In the realm of computing, encountering system issues or errors is an inevitable part of the user experience. However, with the right tools and knowledge at your disposal, troubleshooting and resolving these issues can be a straightforward and empowering process. Windows XP, despite being an older operating system, provides users with a powerful tool called the Recovery Console, designed to diagnose and repair a wide range of system-related problems. Whether facing boot issues, corrupted system files, or malfunctioning hardware drivers, mastering the use of the Recovery Console empowers users to troubleshoot and resolve issues with confidence and precision. In this extensive guide, we’ll delve deep into the intricacies of using the Windows XP Recovery Console for troubleshooting, providing users with the knowledge and techniques to overcome common system challenges and restore system stability.

Understanding the Windows XP Recovery Console:

Before we explore the methods for using the Recovery Console, it’s crucial to understand the significance of this tool within the Windows XP operating system. The Recovery Console is a command-line utility that provides users with access to essential system recovery and repair tools, allowing them to diagnose and fix problems that may prevent Windows XP from starting or functioning correctly. Accessible via the Windows XP installation disc or by booting into the Recovery Console directly from the Windows XP startup menu, this powerful tool enables users to perform a variety of tasks, including repairing damaged system files, restoring system backups, and fixing boot-related issues.

Step-by-Step Guide to Using the Windows XP Recovery Console:

Now, let’s embark on a systematic journey to utilize the Recovery Console for troubleshooting:

Step 1: Accessing the Recovery Console:

  1. Insert the Windows XP installation disc into your computer’s optical drive.
  2. Restart your computer and boot from the Windows XP installation disc. You may need to adjust the boot order in the BIOS or UEFI settings to prioritize booting from the disc.
  3. When prompted, press any key to boot from the installation disc.
  4. After the Windows Setup screen appears, press the “R” key to enter the Recovery Console.

Step 2: Logging into the Recovery Console:

  1. If prompted, select the Windows XP installation you want to access from the list of available installations.
  2. Enter the administrator password for the selected Windows XP installation and press “Enter.” If no administrator password is set, simply press “Enter” to continue.

Step 3: Navigating the Recovery Console Interface:

  1. Once logged in, you’ll be presented with a command prompt interface similar to the Command Prompt in Windows.
  2. Use standard command-line commands and syntax to navigate directories, list files, and perform various tasks within the Recovery Console environment.

Step 4: Performing Troubleshooting Tasks:

  1. Use the Recovery Console commands to perform various troubleshooting tasks, such as repairing damaged system files, fixing boot-related issues, and restoring system backups.
  2. Commonly used commands include “fixboot” to repair the boot sector, “fixmbr” to repair the Master Boot Record, “chkdsk” to check and repair disk errors, and “copy” to copy files from one location to another.

Step 5: Exiting the Recovery Console:

  1. Once you’ve completed the necessary troubleshooting tasks, type “exit” at the command prompt and press “Enter” to exit the Recovery Console.
  2. Remove the Windows XP installation disc from your computer’s optical drive and restart your computer.

Advanced Techniques and Tips:

For advanced users or those facing more complex system issues, consider the following techniques and tips:

  1. Using Recovery Console Commands: Familiarize yourself with the various Recovery Console commands and their syntax by referring to the built-in help documentation or online resources.
  2. Creating System Restore Points: Before making any significant changes or repairs using the Recovery Console, consider creating a System Restore point to provide a fallback option in case of unforeseen issues.
  3. Performing Disk Imaging: Use disk imaging software to create a complete backup of your system drive before troubleshooting with the Recovery Console. This ensures that you can restore your system to a previous state if necessary.

Conclusion:

In conclusion, the Windows XP Recovery Console is a valuable tool for diagnosing and resolving system-related issues, providing users with essential utilities and commands to restore system stability and functionality. By following the step-by-step guide outlined in this article and considering advanced techniques and tips, users can leverage the power of the Recovery Console to overcome common system challenges and maintain a healthy computing environment on their Windows XP systems. Whether repairing damaged system files, fixing boot-related issues, or performing disk maintenance tasks, mastering the use of the Recovery Console empowers users to troubleshoot with confidence and precision. So dive into the Recovery Console today, explore its capabilities, and unlock a world of possibilities for troubleshooting and system repair on your Windows XP system.

Comprehensive Guide to File and Printer Sharing in Windows XP

April 8, 2024 by Emily

In the interconnected world of computing, sharing files and printers across a network is an essential aspect of collaboration and productivity. Windows XP, despite being an older operating system, offers robust features for enabling and disabling file and printer sharing, allowing users to seamlessly exchange data and print documents with others on the same network. Whether in a home, office, or educational environment, mastering file and printer sharing in Windows XP empowers users to collaborate effectively and streamline workflows. In this comprehensive guide, we’ll delve deep into the intricacies of enabling and disabling file and printer sharing in Windows XP, providing users with the knowledge and tools to optimize their network sharing experience.

Understanding File and Printer Sharing in Windows XP:

Before we explore the methods for enabling and disabling file and printer sharing, it’s crucial to understand the significance of these features within the Windows XP operating system. File sharing allows users to share folders and files with others on the same network, facilitating collaboration, data exchange, and remote access to shared resources. Printer sharing enables users to share printers connected to their computer with other network users, allowing multiple users to print documents from a single printer. By enabling file and printer sharing, users can enhance productivity, streamline workflows, and promote collaboration in a networked environment.

Step-by-Step Guide to Enabling File and Printer Sharing:

Now, let’s explore a systematic approach to enabling file and printer sharing in Windows XP:

Step 1: Accessing Network Connections:

  1. Click on the “Start” button located at the bottom-left corner of the screen.
  2. Navigate to “Control Panel” and double-click to open it.
  3. In the Control Panel window, locate and open the “Network Connections” icon.

Step 2: Configuring Network Adapter Properties:

  1. Right-click on the network adapter connected to your network and select “Properties” from the context menu.
  2. In the Properties window, check the box next to “File and Printer Sharing for Microsoft Networks” to enable file and printer sharing.
  3. Click on the “OK” button to save the changes and close the Properties window.

Step 3: Configuring Shared Folders:

  1. Navigate to the folder or drive that you want to share with others on the network.
  2. Right-click on the folder or drive and select “Sharing and Security” from the context menu.
  3. In the Sharing tab of the Properties window, check the box next to “Share this folder on the network” to enable sharing.
  4. Optionally, you can specify a share name for the folder and set permissions to control access to the shared resource.
  5. Click on the “OK” button to save the changes and close the Properties window.

Step 4: Configuring Printer Sharing:

  1. Click on the “Start” button and select “Printers and Faxes” from the Start menu.
  2. Right-click on the printer you want to share and select “Sharing” from the context menu.
  3. In the Properties window, check the box next to “Share this printer” to enable printer sharing.
  4. Optionally, you can specify a share name for the printer and set permissions to control access to the shared printer.
  5. Click on the “OK” button to save the changes and close the Properties window.

Step 5: Testing File and Printer Sharing:

  1. To test file sharing, access a shared folder from another computer on the network and verify that you can view and access files within the shared folder.
  2. To test printer sharing, try printing a document from another computer on the network to the shared printer and verify that the document prints successfully.

Step-by-Step Guide to Disabling File and Printer Sharing:

If you wish to disable file and printer sharing in Windows XP, follow these steps:

Step 1: Accessing Network Connections:

  1. Click on the “Start” button located at the bottom-left corner of the screen.
  2. Navigate to “Control Panel” and double-click to open it.
  3. In the Control Panel window, locate and open the “Network Connections” icon.

Step 2: Disabling File and Printer Sharing:

  1. Right-click on the network adapter connected to your network and select “Properties” from the context menu.
  2. In the Properties window, uncheck the box next to “File and Printer Sharing for Microsoft Networks” to disable file and printer sharing.
  3. Click on the “OK” button to save the changes and close the Properties window.

Step 3: Removing Shared Folders and Printers:

  1. To remove shared folders, navigate to the folder or drive that you want to stop sharing and open the Properties window.
  2. In the Sharing tab, uncheck the box next to “Share this folder on the network” to stop sharing the folder.
  3. Click on the “OK” button to save the changes and close the Properties window.
  4. To remove shared printers, open the Properties window of the printer you want to stop sharing and uncheck the box next to “Share this printer.”
  5. Click on the “OK” button to save the changes and close the Properties window.

Advanced Techniques and Tips:

For advanced users or those seeking additional customization options, consider the following tips:

  1. Firewall Configuration: Ensure that your firewall settings allow file and printer sharing traffic to pass through. Configure firewall settings to permit File and Printer Sharing exceptions or create custom rules to allow traffic on specific ports.
  2. Network Discovery: Enable Network Discovery in the Network and Sharing Center to allow Windows XP to detect other computers and devices on the network and share resources more easily.
  3. Advanced Sharing Settings: Customize advanced sharing settings in the Network and Sharing Center to control network discovery, file sharing, and printer sharing options according to your preferences.

Conclusion:

In conclusion, enabling and disabling file and printer sharing in Windows XP is a fundamental aspect of network management and collaboration. By following the step-by-step guides outlined in this article and considering advanced techniques and tips, users can harness the full potential of file and printer sharing to streamline workflows, enhance productivity, and promote collaboration in a networked environment. Whether sharing files with colleagues, accessing shared resources from remote locations, or printing documents from multiple computers to a shared printer, mastering file and printer sharing in Windows XP empowers users to optimize their network sharing experience with precision, efficiency, and confidence. So take control of your network sharing today, enable or disable file and printer sharing as needed, and unlock a world of possibilities for collaboration and productivity on your Windows XP system.

Mastering Process Management: A Comprehensive Guide to Using the Windows Task Manager in Windows XP

April 8, 2024 by Emily

In the realm of computer systems management, effective monitoring and control of processes are essential for optimizing system performance, troubleshooting issues, and ensuring stability. Windows XP, although an older operating system, offers users a powerful tool called the Task Manager, designed to facilitate process management, resource monitoring, and system analysis. Whether identifying and terminating problematic processes, monitoring system performance, or analyzing resource usage, the Task Manager provides users with the necessary tools and insights to maintain a healthy and efficient computing environment. In this comprehensive guide, we’ll delve deep into the intricacies of using the Task Manager in Windows XP, empowering users to manage processes with precision, efficiency, and confidence.

Understanding the Task Manager in Windows XP:

Before we explore the methods for using the Task Manager, it’s essential to understand the significance of this tool within the Windows XP operating system. The Task Manager is a system utility that allows users to view and manage running processes, monitor system performance, and troubleshoot issues related to application and system resource usage. Accessible via keyboard shortcuts or the Ctrl+Alt+Delete menu, the Task Manager provides a comprehensive overview of active processes, CPU and memory usage, and system performance metrics, empowering users to identify and address issues that may impact system performance or stability.

Step-by-Step Guide to Using the Task Manager:

Now, let’s explore a systematic approach to using the Task Manager in Windows XP:

Step 1: Accessing the Task Manager:

  1. Press the Ctrl+Alt+Delete keys simultaneously to open the Windows Security dialog box.
  2. From the Windows Security dialog box, click on the “Task Manager” option to launch the Task Manager utility.

Step 2: Navigating the Task Manager Interface:

  1. Upon launching the Task Manager, you’ll be presented with several tabs, including Applications, Processes, Performance, and Networking.
  2. The “Applications” tab displays a list of currently running applications and allows users to switch between open applications or end unresponsive ones.
  3. The “Processes” tab provides a detailed view of all running processes, including system processes and user applications, along with associated resource usage metrics.

Step 3: Managing Processes:

  1. In the Processes tab, users can view a list of running processes along with their respective CPU and memory usage.
  2. To terminate a process, simply select it from the list and click on the “End Process” button. Exercise caution when terminating processes, as ending critical system processes may lead to system instability or data loss.
  3. Users can also right-click on a process to access additional options such as “End Process Tree,” “Set Priority,” and “Set Affinity,” allowing for more granular control over process management.

Step 4: Monitoring System Performance:

  1. Switch to the Performance tab to view real-time system performance metrics, including CPU and memory usage graphs.
  2. The Performance tab also provides information on disk activity, network usage, and system uptime, allowing users to monitor system health and identify potential bottlenecks or issues.

Step 5: Analyzing Networking Activity:

  1. Navigate to the Networking tab to monitor network activity and view information about network utilization, connection status, and network adapter performance.
  2. Users can monitor network usage in real-time and identify applications or processes consuming excessive network bandwidth.

Advanced Techniques and Tips:

For advanced users or those seeking additional insights and capabilities, consider the following tips:

  1. Resource Usage Analysis: Use the Task Manager to identify resource-intensive processes and troubleshoot performance issues. Pay attention to processes with high CPU or memory usage and investigate their impact on system performance.
  2. Startup Programs Management: Utilize the Task Manager’s “Startup” tab to manage startup programs and prevent unnecessary applications from launching at system startup. Disable startup programs to improve boot times and streamline system performance.
  3. System Resource Allocation: Experiment with process priority and affinity settings to optimize system resource allocation and improve responsiveness for critical applications. Adjusting process priorities can help ensure that essential tasks receive adequate CPU resources and prioritize system responsiveness.

Conclusion:

In conclusion, the Task Manager in Windows XP is a versatile and powerful tool that empowers users to manage processes, monitor system performance, and troubleshoot issues effectively. By following the step-by-step guide outlined in this article and considering advanced techniques and tips, users can harness the full potential of the Task Manager to maintain a healthy and efficient computing environment on their Windows XP systems. Whether terminating unresponsive processes, monitoring system performance metrics, or analyzing networking activity, mastering the use of the Task Manager enables users to take control of their system’s performance and stability with confidence and precision. So dive into the Task Manager today, explore its features and capabilities, and unlock a world of possibilities for managing processes in Windows XP.

Navigating the Digital Landscape: A Comprehensive Guide to Changing the Default Web Browser in Windows XP

April 8, 2024 by Emily

In the modern digital era, web browsing has become an indispensable part of our daily lives, allowing us to access information, communicate with others, and explore the vast expanse of the internet. Windows XP, although considered a legacy operating system, still retains its relevance for many users around the world. While Internet Explorer was the default web browser bundled with Windows XP, users have the freedom to choose their preferred browser for navigating the web. In this extensive guide, we will delve deep into the intricacies of changing the default web browser in Windows XP, providing users with a detailed roadmap to customize their browsing experience according to their preferences.

Understanding the Significance of Default Web Browser:

Before we embark on the journey of changing the default web browser, it is crucial to grasp the importance of this setting within the Windows XP operating system. The default web browser dictates which application opens when you click on hyperlinks or attempt to access web content from other applications. While Internet Explorer is the default choice out of the box, users have the liberty to switch to alternative browsers like Mozilla Firefox, Google Chrome, or Opera, each offering unique features and functionalities to enhance the browsing experience. Changing the default web browser allows users to tailor their digital experience, ensuring compatibility, security, and personalization in their web interactions.

Step-by-Step Guide to Changing the Default Web Browser:

Now, let’s embark on a systematic journey to change the default web browser in Windows XP:

Step 1: Accessing Internet Options:

  1. Begin by clicking on the “Start” button located at the bottom-left corner of the screen.
  2. Navigate to the “Control Panel” and double-click to open it.
  3. Within the Control Panel window, locate and select the “Internet Options” icon.

Step 2: Configuring Program Associations:

  1. In the Internet Properties window, navigate to the “Programs” tab.
  2. Under the “Programs” tab, click on the “Set Programs” button located in the “Internet Programs” section.

Step 3: Selecting Default Web Browser:

  1. In the Set Programs window, click on the “Set your default programs” link.
  2. A list of installed programs will appear. Scroll down and select your preferred web browser from the list.
  3. Once selected, click on the “Set this program as default” button to establish the chosen browser as the default for all supported file types and protocols.
  4. Alternatively, you can click on the “Choose defaults for this program” button to customize specific file types and protocols associated with the selected browser.

Step 4: Confirming Changes:

  1. After setting the default web browser, click on the “OK” button to confirm the changes and close the Set Programs window.
  2. Lastly, click on the “OK” or “Apply” button in the Internet Properties window to save the changes and close the window.

Advanced Techniques and Tips:

For users seeking further customization or additional control over their default web browser settings, consider the following tips:

  1. Browser-Specific Settings: Many web browsers offer built-in options to set themselves as the default browser directly from within the application’s settings or preferences menu. Consult the browser’s documentation or support resources for specific instructions tailored to each browser.
  2. Registry Modifications: Experienced users can opt to change the default web browser by manually modifying registry keys. However, caution should be exercised, as incorrect registry modifications can potentially lead to system instability or undesired behavior.
  3. Third-Party Tools: Various third-party utilities and tools are available that offer advanced features for managing default programs and file associations in Windows XP. Explore these tools for additional customization options and enhanced control over default program settings.

Conclusion:

In conclusion, changing the default web browser in Windows XP is a simple yet impactful way to personalize your browsing experience and optimize your digital interactions. By following the step-by-step guide outlined in this article and considering advanced techniques and tips, users can effortlessly transition to their preferred web browser, ensuring a seamless and tailored browsing experience on their Windows XP system. Whether you favor the familiar interface of Internet Explorer or opt for the enhanced features of alternative browsers like Firefox or Chrome, mastering the process of changing the default web browser empowers you to navigate the digital landscape with confidence and convenience. So seize control of your web browsing journey today, make the switch to your preferred browser, and embark on a personalized and optimized online experience with Windows XP.

Comprehensive Guide to Manually Checking and Installing Windows Updates in Windows XP

April 8, 2024 by Emily

In the ever-evolving landscape of technology, staying up-to-date with the latest software updates is crucial for maintaining system security, stability, and performance. Windows XP, despite being an older operating system, still requires regular updates to address vulnerabilities, enhance compatibility, and improve functionality. While automatic updates were a standard feature in later Windows versions, Windows XP users may need to manually check for and install updates to ensure their system remains protected and optimized. In this comprehensive guide, we’ll delve into the intricacies of manually checking for and installing Windows updates in Windows XP, empowering users to take control of their system’s maintenance and security with confidence and precision.

Understanding the Importance of Windows Updates in Windows XP:

Before we explore the methods for manually checking and installing updates, it’s crucial to understand the significance of Windows updates within the Windows XP operating system. Windows updates include patches, security fixes, and software enhancements released by Microsoft to address vulnerabilities, fix bugs, and improve system performance. By installing updates regularly, users can mitigate security risks, ensure compatibility with new software and hardware, and benefit from the latest features and improvements. While automatic updates were introduced in later Windows versions, Windows XP users can still manually download and install updates to keep their systems up-to-date and secure.

Step-by-Step Guide to Manually Checking and Installing Windows Updates:

Now, let’s explore a systematic approach to manually checking for and installing Windows updates in Windows XP:

Step 1: Accessing Windows Update Website:

  1. Open your preferred web browser and navigate to the official Windows Update website.
  2. Alternatively, you can access Windows Update from the Start menu by clicking on “All Programs,” then selecting “Windows Update.”

Step 2: Initiating Windows Update Scan:

  1. Once on the Windows Update website, click on the “Express” or “Custom” button to begin scanning for available updates.
  2. Windows Update will analyze your system configuration and determine which updates are needed based on your installed software and hardware.

Step 3: Reviewing Available Updates:

  1. After the scan is complete, Windows Update will display a list of available updates categorized by type (e.g., critical updates, security updates, optional updates).
  2. Review the list of updates and check the boxes next to the updates you wish to install.

Step 4: Installing Selected Updates:

  1. Click on the “Install Updates” button to begin downloading and installing the selected updates.
  2. Follow the on-screen prompts and instructions to complete the installation process.
  3. Depending on the size and number of updates, this process may take some time. Be patient and allow Windows Update to complete the installation process uninterrupted.

Step 5: Restarting the System (if necessary):

  1. Some updates may require a system restart to take effect.
  2. If prompted, restart your computer to apply the installed updates.

Advanced Techniques and Tips:

For advanced users or those seeking additional control over the update process, consider the following tips:

  1. Using Automatic Updates Service: While Windows XP does not offer built-in automatic updates like later Windows versions, users can still enable the Automatic Updates service to receive notifications about available updates and schedule update installations.
  2. Downloading Updates Manually: In addition to using the Windows Update website, users can manually download individual updates from the Microsoft Download Center and install them offline.
  3. Checking for Office Updates: If you have Microsoft Office installed on your Windows XP system, remember to check for and install Office updates separately from Windows updates to ensure comprehensive system maintenance and security.

Conclusion:

In conclusion, manually checking for and installing Windows updates in Windows XP is a crucial aspect of system maintenance and security. By following the step-by-step guide outlined in this article and considering advanced techniques and tips, users can keep their Windows XP systems up-to-date, secure, and optimized for optimal performance and reliability. Whether installing critical security updates, applying software enhancements, or ensuring compatibility with new hardware and software, mastering the process of Windows updates empowers users to take control of their system’s maintenance and security with confidence and precision. So take charge of your system’s health today, regularly check for and install Windows updates, and ensure your Windows XP experience remains safe, stable, and optimized for years to come.

  • « Go to Previous Page
  • Go to page 1
  • Interim pages omitted …
  • Go to page 22
  • Go to page 23
  • Go to page 24
  • Go to page 25
  • Go to page 26
  • Interim pages omitted …
  • Go to page 77
  • Go to Next Page »

Copyright © 2025 · Genesis Sample Theme on Genesis Framework · WordPress · Log in