How the Internet of Things Is Reshaping IT Infrastructure
How the Internet of Things Is Reshaping IT Infrastructure The Internet of Things (IoT) is no longer simply a future...
How the Internet of Things Is Reshaping IT Infrastructure The Internet of Things (IoT) is no longer simply a future...
Big Data Analytics: Turning Information Into Action In today’s digital world, enterprises create vast volumes of data every second. From...

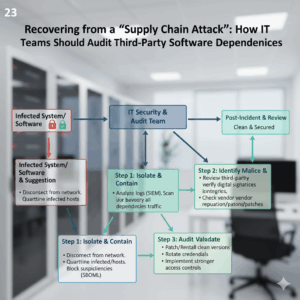
Best Practices for Businesses in the Event of an Information Technology Disaster In the present day, when technology is so...

Data backup is best accomplished with the help of these cloud storage services. In the digital age we live in...

The Significance of Virtual Private Networks VPN and How to Select the Best One Privacy and security are no longer...

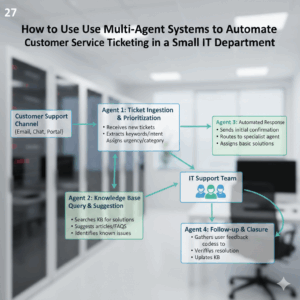
How To Make Daily Workflows More Efficient Using AI Tools Artificial intelligence (AI) is no longer only a future notion;...

The Most Effective Free Video Editing Tools for Those on a Tight Budget Video content has become a dominating force...