Navigating the Digital Realm: A Comprehensive Guide on Adding a Printer in Windows 10
Emily March 19, 2024
In today’s digital age, the ability to seamlessly connect and integrate various devices is essential for productivity and efficiency. Printing remains a fundamental aspect of daily workflows, whether for professional documents, creative projects, or personal use. Windows 10, as a leading operating system, offers robust features and tools for effortlessly adding printers to your computing environment. In this comprehensive guide, we’ll explore the step-by-step process of adding a printer in Windows 10, covering various methods, troubleshooting tips, and best practices to ensure a smooth printing experience.
Understanding the Importance of Adding a Printer
Adding a printer to your Windows 10 device opens up a world of possibilities, allowing you to produce physical copies of digital content with ease. Whether you’re printing documents, photos, or presentations, having a reliable printer setup is essential for meeting your printing needs efficiently. By adding a printer in Windows 10, you gain access to a range of printing options and settings, enabling you to customize your printing experience to suit your preferences and requirements.
Method 1: Adding a Printer via Settings
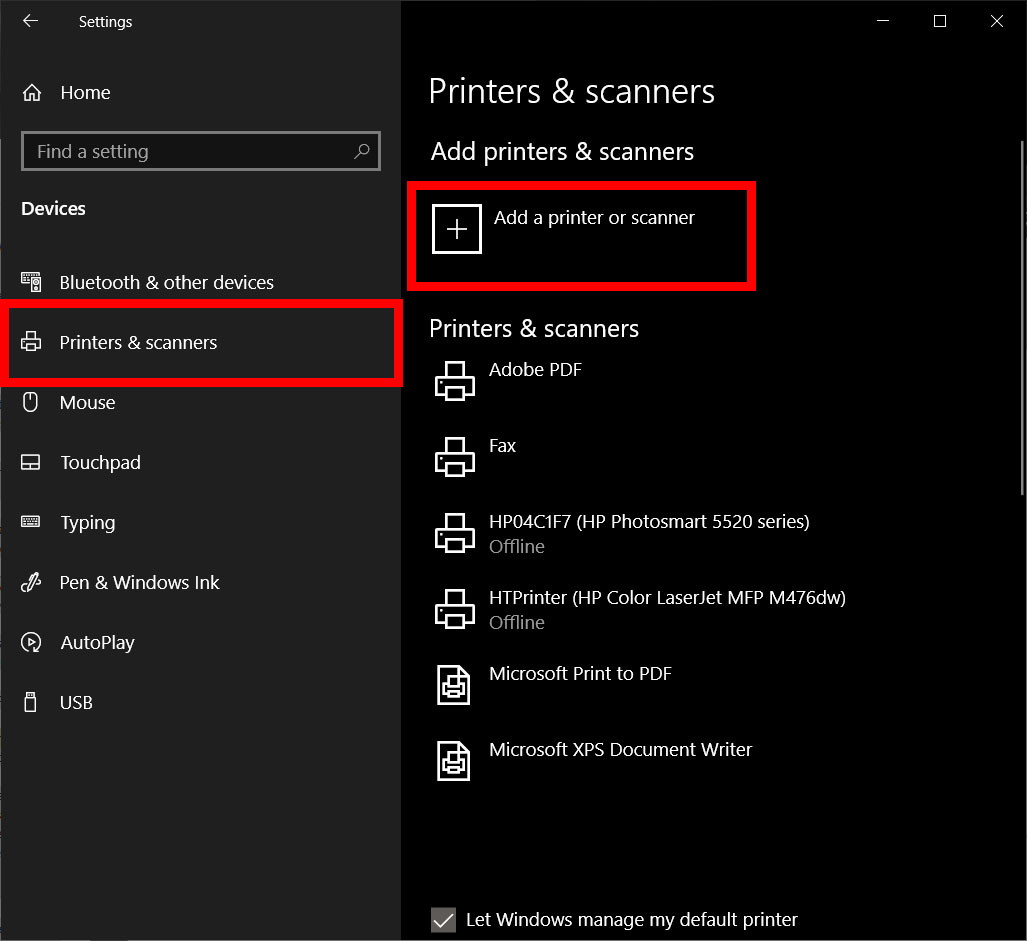
One of the most straightforward methods for adding a printer in Windows 10 is through the Settings app. Follow these steps to add a printer via Settings:
- Open Settings: Click on the Start menu, then select the gear icon to open the Settings app.
- Navigate to Devices: In the Settings app, click on “Devices.”
- Add a Printer or Scanner: Under the “Devices” menu, select “Printers & scanners.” Click on the “Add a printer or scanner” button.
- Detecting Printers: Windows will automatically search for available printers connected to your network or directly connected to your computer.
- Select the Printer: Once the printer is detected, click on its name to add it to your device.
- Install Printer Driver (if necessary): Follow any on-screen prompts to install the printer driver if Windows prompts you to do so.
Method 2: Adding a Printer via Control Panel
Alternatively, you can add a printer in Windows 10 using the Control Panel. Here’s how:
- Open Control Panel: Type “Control Panel” in the Windows search bar and press Enter.
- Navigate to Devices and Printers: In the Control Panel window, click on “Devices and Printers.”
- Add a Printer: Click on the “Add a printer” button at the top of the window.
- Detecting Printers: Windows will search for available printers connected to your network or computer.
- Select the Printer: Once the printer is detected, click on its name to add it to your device.
- Install Printer Driver (if necessary): Follow any on-screen prompts to install the printer driver if Windows prompts you to do so.
Method 3: Adding a Printer Manually
If your printer isn’t automatically detected by Windows, you can add it manually by following these steps:
- Open Settings or Control Panel: Navigate to either the Settings app or Control Panel as described in the previous methods.
- Navigate to Devices or Devices and Printers: Depending on whether you’re using Settings or Control Panel, locate the section for devices or devices and printers.
- Add a Printer Manually: Look for an option to add a printer manually. In Settings, this might be labeled “Add a printer or scanner.” In Control Panel, click on “Add a printer” and then select “Add a local printer” or “Add a network, wireless, or Bluetooth printer.”
- Enter Printer Information: Follow the prompts to enter the printer’s information, such as its IP address or network name.
- Install Printer Driver (if necessary): If Windows prompts you to install a printer driver, follow the on-screen instructions to do so.
Troubleshooting Tips
If you encounter any issues while adding a printer in Windows 10, consider the following troubleshooting tips:
- Check Printer Connectivity: Ensure that the printer is properly connected to your computer or network and turned on.
- Restart Devices: Try restarting both your computer and the printer to refresh their connection.
- Update Printer Drivers: Visit the printer manufacturer’s website to download and install the latest drivers for your printer model.
- Check Network Settings: If using a network printer, verify that your computer and printer are connected to the same network.
- Run Printer Troubleshooter: Windows 10 includes a built-in printer troubleshooter that can help identify and resolve common printing issues. You can access it by typing “Troubleshoot” in the Windows search bar and selecting “Troubleshoot settings.” Then, click on “Printer” and follow the on-screen instructions.
Conclusion
In conclusion, adding a printer in Windows 10 is a straightforward process that enables you to harness the power of digital printing for your everyday tasks and projects. Whether you prefer the simplicity of the Settings app, the familiarity of the Control Panel, or the flexibility of manual configuration, Windows 10 offers multiple methods for seamlessly integrating printers into your computing environment. By following the step-by-step instructions outlined in this guide and leveraging troubleshooting tips when needed, you can establish a reliable printer setup that meets your printing needs with ease and efficiency. With your printer successfully added to Windows 10, you’re ready to embark on a seamless printing journey, bringing your digital creations to life with the touch of a button.


