How to Use Keras for Deep Learning
Keras is a high-level neural networks API, written in Python and capable of running on top of other deep learning frameworks like TensorFlow, Microsoft Cognitive Toolkit (CNTK), or Theano. It provides a user-friendly interface for designing, training, and evaluating deep learning models. Keras simplifies the process of building complex neural network architectures and experimenting with various deep learning techniques.
This comprehensive guide will cover the following topics related to using Keras for deep learning:
- Introduction to Keras
- Setting Up Your Environment
- Understanding the Keras API
- Building Your First Neural Network with Keras
- Data Preparation and Preprocessing
- Model Training and Evaluation
- Advanced Model Architectures
- Handling Overfitting and Underfitting
- Model Deployment
- Integrating Keras with Other Libraries
- Best Practices
- Conclusion
1. Introduction to Keras
What is Keras?
Keras is an open-source deep learning library designed to facilitate the rapid development of neural networks. It provides a high-level API for building and training models, which can be easily integrated with lower-level frameworks like TensorFlow.
Features of Keras
- User-Friendly: Keras is designed for ease of use, making it accessible for beginners and researchers alike.
- Modular: Keras models are composed of modular building blocks, such as layers, optimizers, and loss functions.
- Extensible: It supports customization and extension, allowing advanced users to create custom layers, models, and training loops.
- Backend Flexibility: Keras can run on top of various backend engines, providing flexibility in choosing the computational framework.
2. Setting Up Your Environment
Installing Keras
To get started with Keras, you need to install it along with its backend. The most common backend is TensorFlow. Install both packages using pip:
pip install tensorflow keras
Verifying Installation
To verify the installation, you can check the version of Keras and TensorFlow:
import tensorflow as tf
 import kerasprint("TensorFlow version:", tf.__version__)
 print("Keras version:", keras.__version__)
3. Understanding the Keras API
Key Components of Keras
- Models: The Keras
Modelclass is the base class for all models. It can be used to build Sequential and Functional models. - Layers: Layers are the building blocks of neural networks. Common layers include Dense, Convolutional, and Recurrent layers.
- Optimizers: Optimizers are used to minimize the loss function during training. Examples include SGD, Adam, and RMSprop.
- Loss Functions: Loss functions measure the error between predicted and actual values. Examples include Mean Squared Error and Cross-Entropy.
- Metrics: Metrics are used to evaluate the performance of the model. Common metrics include Accuracy and Precision.
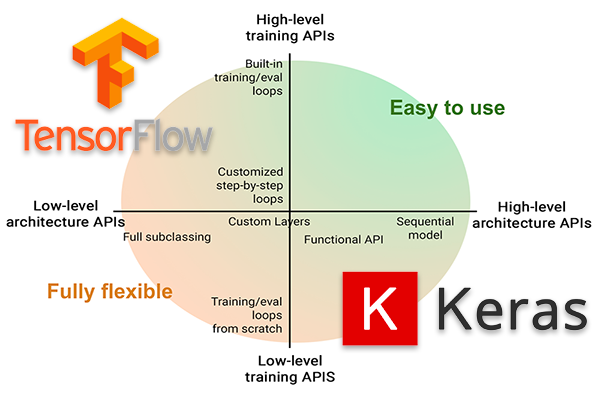
Keras Model Types
- Sequential Model: A linear stack of layers where each layer has exactly one input and one output.
- Functional API: Allows for the creation of complex models with multiple inputs and outputs, shared layers, and non-linear connections.
4. Building Your First Neural Network with Keras
Example: Simple Neural Network for Classification
Here’s a step-by-step guide to building a simple neural network for classifying images from the MNIST dataset using Keras.
Step 1: Import Libraries
import numpy as np
 import tensorflow as tf
 from tensorflow.keras.datasets import mnist
 from tensorflow.keras.models import Sequential
 from tensorflow.keras.layers import Dense, Flatten
 from tensorflow.keras.utils import to_categorical
Step 2: Load and Preprocess Data
# Load MNIST dataset
(x_train, y_train), (x_test, y_test) = mnist.load_data()# Normalize the data
x_train = x_train.astype('float32') / 255
x_test = x_test.astype('float32') / 255
# One-hot encode the labels
y_train = to_categorical(y_train, 10)
y_test = to_categorical(y_test, 10)
Step 3: Define the Model
model = Sequential([
 Flatten(input_shape=(28, 28)),
 Dense(128, activation='relu'),
 Dense(10, activation='softmax')
 ])
Step 4: Compile the Model
model.compile(optimizer='adam',
 loss='categorical_crossentropy',
 metrics=['accuracy'])
Step 5: Train the Model
history = model.fit(x_train, y_train, epochs=5, batch_size=32, validation_split=0.2)
Step 6: Evaluate the Model
test_loss, test_accuracy = model.evaluate(x_test, y_test)
 print("Test accuracy:", test_accuracy)
5. Data Preparation and Preprocessing
Data Loading
Load datasets using Keras’s built-in datasets or custom data loaders.
from tensorflow.keras.datasets import cifar10(x_train, y_train), (x_test, y_test) = cifar10.load_data()
Data Normalization
Normalize pixel values to the range [0, 1] for better convergence during training.
x_train = x_train.astype('float32') / 255
 x_test = x_test.astype('float32') / 255
One-Hot Encoding
Convert class labels into one-hot encoded vectors.
from tensorflow.keras.utils import to_categoricaly_train = to_categorical(y_train, num_classes=10)
 y_test = to_categorical(y_test, num_classes=10)
Data Augmentation
Enhance your dataset by applying transformations such as rotation, translation, and flipping.
from tensorflow.keras.preprocessing.image import ImageDataGeneratordatagen = ImageDataGenerator(
 rotation_range=20,
 width_shift_range=0.2,
 height_shift_range=0.2,
 horizontal_flip=True
 )
 datagen.fit(x_train)
6. Model Training and Evaluation
Training the Model
Train the model using the fit method, specifying the number of epochs and batch size.
history = model.fit(x_train, y_train, epochs=10, batch_size=64, validation_split=0.2)
Monitoring Training
Use callbacks such as EarlyStopping and ModelCheckpoint to monitor and save the best model.
from tensorflow.keras.callbacks import EarlyStopping, ModelCheckpointearly_stopping = EarlyStopping(monitor='val_loss', patience=3)
model_checkpoint = ModelCheckpoint('best_model.h5', save_best_only=True)
history = model.fit(x_train, y_train, epochs=10, batch_size=64,
validation_split=0.2, callbacks=[early_stopping, model_checkpoint])
Evaluating the Model
Evaluate the trained model on the test set to assess its performance.
test_loss, test_accuracy = model.evaluate(x_test, y_test)
 print("Test accuracy:", test_accuracy)
Visualizing Training History
Plot the training and validation accuracy and loss to understand model performance over epochs.
import matplotlib.pyplot as pltplt.plot(history.history['accuracy'])
plt.plot(history.history['val_accuracy'])
plt.title('Model accuracy')
plt.xlabel('Epoch')
plt.ylabel('Accuracy')
plt.legend(['Train', 'Validation'])
plt.show()
plt.plot(history.history['loss'])
plt.plot(history.history['val_loss'])
plt.title('Model loss')
plt.xlabel('Epoch')
plt.ylabel('Loss')
plt.legend(['Train', 'Validation'])
plt.show()
7. Advanced Model Architectures
Convolutional Neural Networks (CNNs)
CNNs are used for image processing tasks. They use convolutional layers to automatically extract features from images.
from tensorflow.keras.layers import Conv2D, MaxPooling2Dmodel = Sequential([
 Conv2D(32, kernel_size=(3, 3), activation='relu', input_shape=(32, 32, 3)),
 MaxPooling2D(pool_size=(2, 2)),
 Conv2D(64, kernel_size=(3, 3), activation='relu'),
 MaxPooling2D(pool_size=(2, 2)),
 Flatten(),
 Dense(128, activation='relu'),
 Dense(10, activation='softmax')
 ])
Recurrent Neural Networks (RNNs)
RNNs are suitable for sequence data. They have memory cells to process sequential inputs.
from tensorflow.keras.layers import LSTMmodel = Sequential([
 LSTM(128, input_shape=(timesteps, features)),
 Dense(10, activation='softmax')
 ])
Transfer Learning
Leverage pre-trained models and fine-tune them for your specific task.
from tensorflow.keras.applications import VGG16
from tensorflow.keras.layers import GlobalAveragePooling2Dbase_model = VGG16(weights='imagenet', include_top=False, input_shape=(224, 224, 3))
x = base_model.output
x = GlobalAveragePooling2D()(x)
x = Dense(1024, activation='relu')(x)
predictions = Dense(10, activation='softmax')(x)
model = Model(inputs=base_model.input, outputs=predictions)
Generative Adversarial Networks (GANs)
GANs consist of a generator and a discriminator network, used for generating synthetic data.
from tensorflow.keras.layers import Input, Dense
from tensorflow.keras.models import Model# Generator
def build_generator():
model = Sequential()
model.add(Dense(256, input_dim=100, activation='relu'))
model.add(Dense(784, activation='sigmoid'))
return model
# Discriminator
def build_discriminator():
model = Sequential()
model.add(Dense(256, input_dim=784, activation='relu'))
model.add(Dense(1, activation='sigmoid'))
return model
8. Handling Overfitting and Underfitting
Regularization Techniques
- L1/L2 Regularization: Adds a penalty to the loss function based on the weights.
from tensorflow.keras.regularizers import l2model = Sequential([
 Dense(128, activation='relu', kernel_regularizer=l2(0.01)),
 Dense(10, activation='softmax')
 ])
- Dropout: Randomly drops units from the network during training to prevent overfitting.
from tensorflow.keras.layers import Dropoutmodel = Sequential([
 Dense(128, activation='relu'),
 Dropout(0.5),
 Dense(10, activation='softmax')
 ])
Cross-Validation
Use cross-validation to assess model performance and avoid overfitting.
from sklearn.model_selection import KFoldkf = KFold(n_splits=5)
 for train_index, val_index in kf.split(x_train):
 x_train_cv, x_val_cv = x_train[train_index], x_train[val_index]
 y_train_cv, y_val_cv = y_train[train_index], y_train[val_index] # Train model here
9. Model Deployment
Saving and Loading Models
Save and load trained models using the Keras save and load_model functions.
# Save model
 model.save('my_model.h5')# Load model
 from tensorflow.keras.models import load_model
 loaded_model = load_model('my_model.h5')
Serving Models
Deploy models for inference using TensorFlow Serving or a web framework like Flask.
from flask import Flask, request, jsonify
import numpy as npapp = Flask(__name__)
def predict():
data = request.get_json()
input_data = np.array(data['input'])
predictions = model.predict(input_data)
return jsonify(predictions.tolist())
if __name__ == '__main__':
app.run()
10. Integrating Keras with Other Libraries
TensorFlow
Keras is a high-level API of TensorFlow, but you can directly use TensorFlow functions for custom operations.
import tensorflow as tf# Custom loss function using TensorFlow
 def custom_loss(y_true, y_pred):
 return tf.reduce_mean(tf.square(y_true - y_pred))
Scikit-Learn
Integrate Keras models with Scikit-Learn for tasks such as grid search and cross-validation.
from sklearn.model_selection import GridSearchCV
from tensorflow.keras.wrappers.scikit_learn import KerasClassifierdef create_model(optimizer='adam'):
model = Sequential([
Dense(128, activation='relu'),
Dense(10, activation='softmax')
])
model.compile(optimizer=optimizer, loss='categorical_crossentropy', metrics=['accuracy'])
return model
model = KerasClassifier(build_fn=create_model, epochs=10, batch_size=32)
param_grid = {'optimizer': ['adam', 'rmsprop']}
grid = GridSearchCV(estimator=model, param_grid=param_grid)
grid_result = grid.fit(x_train, y_train)
11. Best Practices
Model Design
- Start Simple: Begin with simple architectures and increase complexity as needed.
- Modular Design: Build models in a modular fashion to facilitate experimentation.
Training
- Use Callbacks: Implement callbacks for monitoring, saving, and adjusting the training process.
- Experiment with Hyperparameters: Tune hyperparameters such as learning rate, batch size, and number of layers.
Evaluation
- Use Validation Data: Monitor model performance on validation data to prevent overfitting.
- Analyze Metrics: Evaluate various metrics beyond accuracy, such as precision, recall, and F1-score.
Deployment
- Optimize for Inference: Convert models to formats optimized for deployment, such as TensorFlow Lite or ONNX.
- Monitor and Update: Continuously monitor model performance in production and update as needed.
12. Conclusion
Keras simplifies the process of building and training deep learning models, making it accessible to both beginners and experienced practitioners. Its intuitive API, coupled with powerful backend support, allows for rapid experimentation and deployment of complex neural networks. By understanding the fundamental concepts, exploring advanced features, and following best practices, you can effectively leverage Keras to develop sophisticated deep learning applications.
With this comprehensive guide, you are well-equipped to start using Keras for your deep learning projects, whether you’re building simple models or tackling complex problems. As the field of deep learning continues to evolve, Keras will remain a valuable tool in your data science toolkit.