Comprehensive Guide: How to jump-start a car
Jump-starting a car is a crucial skill that every driver should know. Whether your car’s battery has died due to leaving the lights on, extreme temperatures, or an old battery, being able to jump-start it can save you from being stranded and needing assistance. This comprehensive guide will walk you through the step-by-step process of safely jump-starting a car using jumper cables and another vehicle.
Step 1: Safety Precautions
Before attempting to jump-start a car, prioritize safety:
- Location: Park both vehicles in a safe, flat area away from traffic.
- Turn Off Ignitions: Turn off the ignition and all electrical systems (lights, radio, etc.) in both vehicles.
- Identify Terminals: Locate the battery terminals on both vehicles. They are usually marked with positive (+) and negative (-) symbols.
- Inspect Cables: Ensure the jumper cables are in good condition with no visible damage or exposed wires.
Step 2: Positioning Vehicles
- Bring Vehicles Close: Position the vehicles close enough for the jumper cables to reach between their batteries but ensure they do not touch each other.
- Engage Parking Brakes: Engage the parking brake firmly on both vehicles to prevent any movement during the jump-start process.
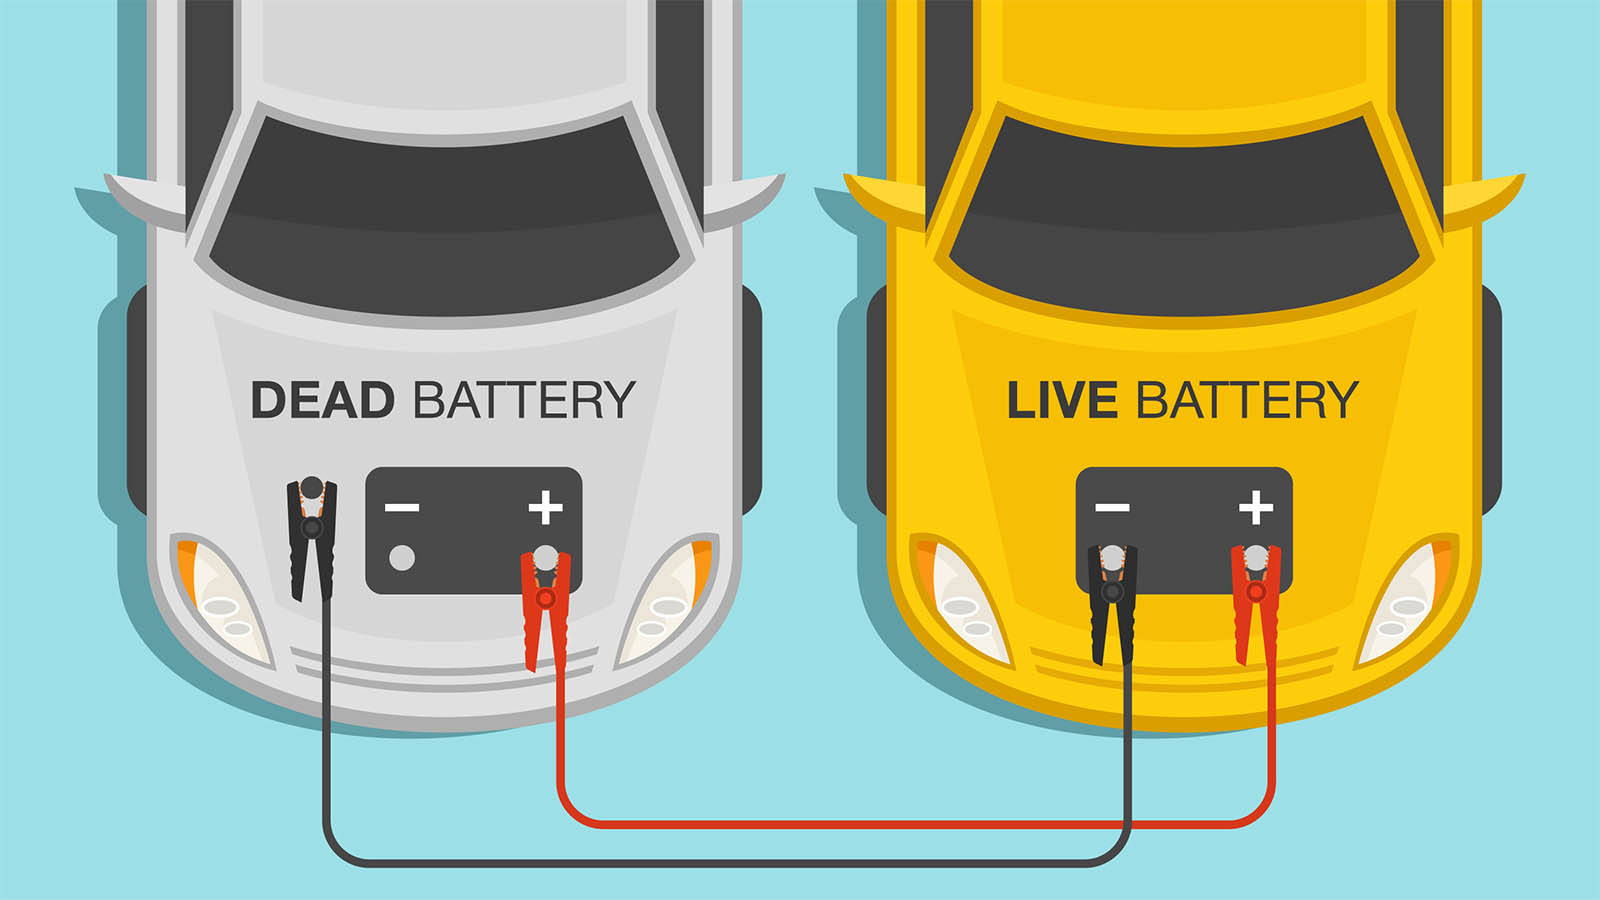
Step 3: Connecting Jumper Cables
Follow these steps to connect the jumper cables correctly:
- Connect Positive (+) Terminals:
- Start with the vehicle with the good battery (donor vehicle).
- Connect one end of the red (positive) jumper cable to the positive terminal (+) of the donor vehicle’s battery.
- Connect Positive (+) Terminal of Dead Battery:
- Connect the other end of the red (positive) jumper cable to the positive terminal (+) of the dead battery.
- Connect Negative (-) Terminal of Donor Vehicle:
- Connect one end of the black (negative) jumper cable to the negative terminal (-) of the donor vehicle’s battery.
- Ground Connection on the Dead Vehicle:
- Find an unpainted metal surface on the engine block or chassis of the vehicle with the dead battery (dead vehicle).
- Connect the other end of the black (negative) jumper cable to this metal surface. Avoid the battery terminal, fuel lines, and moving parts.
Step 4: Jump-Starting Process
Follow these steps to jump-start the dead vehicle:
- Start the Donor Vehicle:
- Start the engine of the donor vehicle and let it run for a few minutes. This allows the battery to charge the dead battery.
- Attempt to Start the Dead Vehicle:
- Attempt to start the engine of the vehicle with the dead battery. Turn the ignition key and hold it for a few seconds.
- Monitor Progress:
- If the dead vehicle doesn’t start immediately, wait a few more minutes and try again.
- Revving the engine slightly on the donor vehicle can provide more charging power to the dead battery.
Step 5: Disconnecting Jumper Cables
Once the dead vehicle has been successfully jump-started, follow these steps to disconnect the jumper cables:
- Disconnect in Reverse Order:
- Start with the black (negative) jumper cable and remove it from the metal ground on the engine block or chassis of the previously dead vehicle.
- Remove Black (Negative) Cable from Donor Vehicle:
- Remove the other end of the black (negative) jumper cable from the negative terminal (-) of the donor vehicle’s battery.
- Remove Red (Positive) Cable from Previously Dead Vehicle:
- Remove the red (positive) jumper cable from the positive terminal (+) of the previously dead vehicle’s battery.
- Remove Red (Positive) Cable from Donor Vehicle:
- Finally, remove the red (positive) jumper cable from the positive terminal (+) of the donor vehicle’s battery.
Step 6: Post-Jump Start Checks
After jump-starting the vehicle, perform the following checks:
- Run the Engine: Let the engine run for at least 10-15 minutes to allow the alternator to recharge the battery fully.
- Check Electrical Systems: Test the headlights, indicators, and other electrical systems to ensure they are functioning properly.
- Consider Battery Replacement: If your battery repeatedly fails to hold a charge, it may be time to replace it.
Tips for Success:
- Use Properly Rated Cables: Ensure the jumper cables are heavy-duty and properly rated for jump-starting vehicles.
- Avoid Sparks: Keep the jumper cable clamps away from each other and metal surfaces to avoid sparks.
- Consult Vehicle Manuals: Refer to the owner’s manuals of both vehicles for specific instructions or precautions.
When to Seek Professional Help:
If jump-starting the vehicle does not work after multiple attempts, it may indicate a deeper issue such as a faulty alternator or starter. In such cases, it is advisable to seek assistance from a professional mechanic.
Conclusion
Learning how to jump-start a car is a valuable skill that can save you time, money, and inconvenience. By following these step-by-step instructions and safety precautions, you can safely jump-start a vehicle using jumper cables and another vehicle with a charged battery. Remember to prioritize safety, follow the correct sequence of steps, and perform post-jump-start checks to ensure everything is in working order. With practice, you’ll gain confidence in handling unexpected situations where a jump-start is needed.