Mastering Troubleshooting with the Windows XP Recovery Console

In the realm of computing, encountering system issues or errors is an inevitable part of the user experience. However, with the right tools and knowledge at your disposal, troubleshooting and resolving these issues can be a straightforward and empowering process. Windows XP, despite being an older operating system, provides users with a powerful tool called the Recovery Console, designed to diagnose and repair a wide range of system-related problems. Whether facing boot issues, corrupted system files, or malfunctioning hardware drivers, mastering the use of the Recovery Console empowers users to troubleshoot and resolve issues with confidence and precision. In this extensive guide, we’ll delve deep into the intricacies of using the Windows XP Recovery Console for troubleshooting, providing users with the knowledge and techniques to overcome common system challenges and restore system stability.
Understanding the Windows XP Recovery Console:
Before we explore the methods for using the Recovery Console, it’s crucial to understand the significance of this tool within the Windows XP operating system. The Recovery Console is a command-line utility that provides users with access to essential system recovery and repair tools, allowing them to diagnose and fix problems that may prevent Windows XP from starting or functioning correctly. Accessible via the Windows XP installation disc or by booting into the Recovery Console directly from the Windows XP startup menu, this powerful tool enables users to perform a variety of tasks, including repairing damaged system files, restoring system backups, and fixing boot-related issues.
Step-by-Step Guide to Using the Windows XP Recovery Console:
Now, let’s embark on a systematic journey to utilize the Recovery Console for troubleshooting:
Step 1: Accessing the Recovery Console:
- Insert the Windows XP installation disc into your computer’s optical drive.
- Restart your computer and boot from the Windows XP installation disc. You may need to adjust the boot order in the BIOS or UEFI settings to prioritize booting from the disc.
- When prompted, press any key to boot from the installation disc.
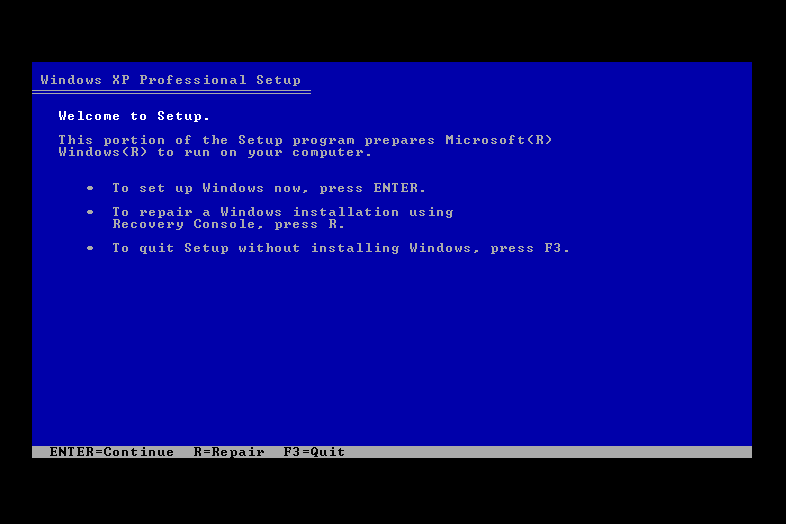
- After the Windows Setup screen appears, press the “R” key to enter the Recovery Console.
Step 2: Logging into the Recovery Console:
- If prompted, select the Windows XP installation you want to access from the list of available installations.
- Enter the administrator password for the selected Windows XP installation and press “Enter.” If no administrator password is set, simply press “Enter” to continue.
Step 3: Navigating the Recovery Console Interface:
- Once logged in, you’ll be presented with a command prompt interface similar to the Command Prompt in Windows.
- Use standard command-line commands and syntax to navigate directories, list files, and perform various tasks within the Recovery Console environment.
Step 4: Performing Troubleshooting Tasks:
- Use the Recovery Console commands to perform various troubleshooting tasks, such as repairing damaged system files, fixing boot-related issues, and restoring system backups.
- Commonly used commands include “fixboot” to repair the boot sector, “fixmbr” to repair the Master Boot Record, “chkdsk” to check and repair disk errors, and “copy” to copy files from one location to another.
Step 5: Exiting the Recovery Console:
- Once you’ve completed the necessary troubleshooting tasks, type “exit” at the command prompt and press “Enter” to exit the Recovery Console.
- Remove the Windows XP installation disc from your computer’s optical drive and restart your computer.
Advanced Techniques and Tips:
For advanced users or those facing more complex system issues, consider the following techniques and tips:
- Using Recovery Console Commands: Familiarize yourself with the various Recovery Console commands and their syntax by referring to the built-in help documentation or online resources.
- Creating System Restore Points: Before making any significant changes or repairs using the Recovery Console, consider creating a System Restore point to provide a fallback option in case of unforeseen issues.
- Performing Disk Imaging: Use disk imaging software to create a complete backup of your system drive before troubleshooting with the Recovery Console. This ensures that you can restore your system to a previous state if necessary.
Conclusion:
In conclusion, the Windows XP Recovery Console is a valuable tool for diagnosing and resolving system-related issues, providing users with essential utilities and commands to restore system stability and functionality. By following the step-by-step guide outlined in this article and considering advanced techniques and tips, users can leverage the power of the Recovery Console to overcome common system challenges and maintain a healthy computing environment on their Windows XP systems. Whether repairing damaged system files, fixing boot-related issues, or performing disk maintenance tasks, mastering the use of the Recovery Console empowers users to troubleshoot with confidence and precision. So dive into the Recovery Console today, explore its capabilities, and unlock a world of possibilities for troubleshooting and system repair on your Windows XP system.


