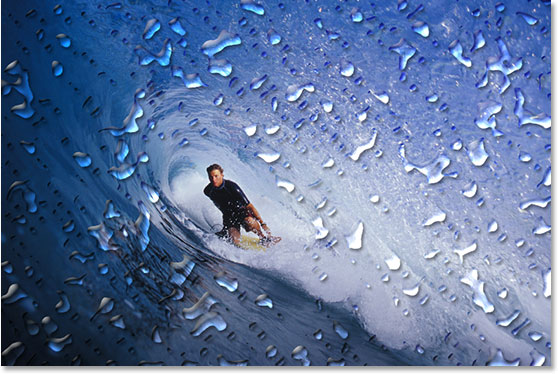
Mastering Realism: A Comprehensive Guide to Adding Waterdrops to Your Photos in Photoshop

In the realm of digital image editing, mastering the art of realism can transform ordinary photographs into stunning works of art. One technique that adds depth, texture, and visual interest to images is the addition of realistic waterdrops. Whether you’re enhancing a macro shot, creating a surreal landscape, or adding a touch of whimsy to portraits, Photoshop provides a wealth of tools and techniques for seamlessly incorporating waterdrops into your photos. In this comprehensive guide, we’ll explore step-by-step methods, expert tips, and creative strategies to help you master the art of adding realistic waterdrops to your images in Photoshop.
Understanding the Impact of Realistic Waterdrops
Waterdrops are more than just simple embellishments; they can evoke emotions, enhance storytelling, and elevate the visual impact of your photographs. From capturing the freshness of raindrops on foliage to conveying the delicate beauty of dew on petals, waterdrops add a sense of realism and authenticity to images, drawing viewers into the scene and immersing them in the moment. By mastering the art of adding realistic waterdrops in Photoshop, you can infuse your photos with depth, dimension, and a touch of magic.
Method 1: Using Custom Brushes
One of the most versatile methods for adding realistic waterdrops to your photos in Photoshop is by using custom brushes. These brushes mimic the natural shapes and textures of waterdrops, allowing you to paint them onto your images with precision and control. Here’s how to create and use custom waterdrop brushes:
- Find or Create Waterdrop Images: Start by finding high-resolution images of waterdrops or photographing your own. Ensure the background is transparent or easily removable.
- Create Custom Brushes: In Photoshop, open the waterdrop image and use the Magic Wand tool or Select Subject command to select the waterdrops. Then, go to Edit > Define Brush Preset to create a custom brush.
- Adjust Brush Settings: Fine-tune the brush settings, such as size, spacing, scattering, and shape dynamics, to achieve the desired effect. Experiment with different settings to create variations in size, opacity, and angle.
- Paint Waterdrops onto Your Image: Select the Brush tool (B) and choose your custom waterdrop brush. Adjust the brush size and opacity as needed, then paint waterdrops onto your photo using light, feathery strokes.
- Blend and Refine: Use layer blending modes, opacity adjustments, and layer masks to blend the waterdrops seamlessly into your image. Experiment with different blending modes, such as Screen or Overlay, to achieve the desired look.
Method 2: Adding Realistic Highlights and Shadows
To enhance the realism of your waterdrops, it’s essential to pay attention to lighting and shadow effects. By adding highlights and shadows to your waterdrops, you can create the illusion of depth and dimension, making them appear more lifelike. Here’s how to add realistic highlights and shadows to your waterdrops in Photoshop:
- Create a New Layer: Start by creating a new layer above your photo layer. This layer will be used for painting highlights and shadows.
- Select the Brush Tool: Choose a soft, round brush with low opacity and flow settings. Set the foreground color to white for highlights and black for shadows.
- Paint Highlights and Shadows: Using the brush tool, paint white highlights on the top of each waterdrop and black shadows on the bottom. Pay attention to the direction of light in your image and adjust the placement of highlights and shadows accordingly.
- Adjust Opacity and Blending Mode: Once you’ve painted highlights and shadows, adjust the opacity and blending mode of the layer to blend the effects seamlessly into your image. Experiment with different blending modes, such as Overlay or Soft Light, to achieve the desired look.
Method 3: Adding Refraction and Reflection Effects
To further enhance the realism of your waterdrops, consider adding refraction and reflection effects. These effects simulate the way light interacts with water, creating mesmerizing distortions and reflections that add depth and complexity to your images. Here’s how to add refraction and reflection effects to your waterdrops in Photoshop:
- Duplicate and Flip Waterdrops: Start by duplicating the layer containing your waterdrops. Flip the duplicated layer vertically to create a reflection effect.
- Apply Gaussian Blur: Apply a Gaussian Blur filter to the duplicated layer to soften the reflection and create a more realistic appearance.
- Adjust Opacity and Blending Mode: Adjust the opacity and blending mode of the duplicated layer to blend the reflection seamlessly into your image. Experiment with different blending modes, such as Screen or Multiply, to achieve the desired effect.
- Add Refraction Distortion: To create refraction effects, use the Liquify filter to distort the underlying image beneath the waterdrops. Experiment with different brush sizes and pressure settings to create realistic distortion patterns.
- Blend and Fine-Tune: Use layer masks, opacity adjustments, and blending modes to blend the refraction and reflection effects seamlessly into your image. Pay attention to the direction of light and adjust the placement and intensity of the effects accordingly.
Conclusion
In conclusion, adding realistic waterdrops to your photos in Photoshop is a creative and rewarding process that allows you to enhance the visual impact and storytelling potential of your images. By mastering techniques such as using custom brushes, adding highlights and shadows, and incorporating refraction and reflection effects, you can infuse your photos with depth, dimension, and a touch of magic. Experiment with different methods, tools, and creative strategies to discover the endless possibilities for incorporating waterdrops into your digital compositions. With patience, practice, and attention to detail, you can elevate your photography to new heights and captivate viewers with mesmerizing images that come to life with the beauty of water.


