Mastering Visual Harmony: Placing an Image in Text with Photoshop CC and CS6

Introduction:
In the ever-evolving landscape of digital design, Adobe Photoshop remains the go-to platform for unleashing creative potential. One captivating technique that seamlessly merges text and imagery is the art of placing an image within text. This comprehensive guide will walk you through the step-by-step process, covering both Photoshop CC and CS6, to empower you with the skills to seamlessly integrate images into text for visually striking and dynamic designs.
Setting the Canvas:
Before embarking on the journey of placing an image in text, create a new document in Photoshop. The dimensions of the canvas will depend on your project requirements, so consider factors such as intended use, resolution, and design preferences. A well-chosen canvas provides a solid foundation for your creative endeavor.
Choosing the Right Font:
Font selection is a pivotal element in successful typography-based designs. Choose a font that complements your project’s theme and enhances the overall visual harmony. Experiment with different typefaces, sizes, and styles to find the perfect balance that aligns with your creative vision.
Adding Text to the Canvas:
Activate the Text tool from the toolbar, click on the canvas, and type the desired text. Position the text according to your design preferences, and choose a color that contrasts well with the image you plan to incorporate. Once satisfied with the text, rasterize the layer to enable image placement within it.
Importing the Image:
Select the image you wish to place within the text and open it in Photoshop. Using the Move tool, drag the image onto the canvas containing the text. Position the image layer above the text layer in the Layers panel. This layer arrangement is crucial for achieving the desired visual effect.
Clipping Mask in Photoshop CC:
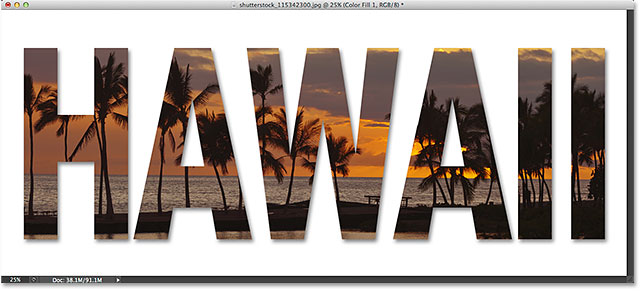
For users working with Photoshop CC, creating a clipping mask is a straightforward process. Right-click on the image layer in the Layers panel and choose “Create Clipping Mask.” The image will now be confined within the contours of the text, seamlessly integrating the two elements.
Clipping Mask in Photoshop CS6:
In Photoshop CS6, the process is slightly different but equally effective. Hold down the Alt key (Option key on Mac) and position the cursor between the text layer and the image layer in the Layers panel. Click when you see the cursor change to an overlapping square icon. This action creates a clipping mask, confining the image within the text boundaries.
Adjusting Image Placement:
Fine-tune the placement and size of the image within the text to achieve the desired visual impact. Use the Transform controls (Ctrl+T or Command+T) to resize, rotate, or reposition the image. Experiment with different adjustments until you find the arrangement that enhances the overall composition.
Refining Edges for Seamless Integration:
To ensure a seamless integration of the image and text, refine the edges of the image layer. Use tools like the Eraser tool or Layer Mask to clean up any stray pixels and achieve a polished appearance. Pay attention to details, especially around the contours of the text.
Adding Depth with Layer Styles:
Elevate the visual appeal of the integrated image and text by applying layer styles. Double-click on the text layer to access the Layer Style panel. Experiment with options like Drop Shadow, Inner Shadow, and Bevel and Emboss to introduce depth and dimension. Layer styles enhance the overall aesthetic and contribute to the visual cohesion of the design.
Experimenting with Blend Modes:
Explore blend modes to create intriguing interactions between the text and the integrated image. Blending modes determine how layers interact with each other, offering a range of visual effects. Experiment with modes like Multiply, Overlay, or Screen to discover unique combinations that enhance the overall design.
Saving and Exporting:
Once satisfied with your design, it’s time to save and share your creation. Save the Photoshop (.PSD) file to retain all layers, styles, and editability. For sharing or use in other projects, export your design as a high-quality image file (.JPEG, .PNG) with a transparent background if desired.
Conclusion:
The process of placing an image in text with Photoshop CC and CS6 unlocks a realm of creative possibilities where typography and imagery seamlessly converge. Whether you’re designing eye-catching posters, engaging social media graphics, or captivating digital art, this technique offers a versatile tool for visual storytelling.
So, dive into the world of integrated text and images, experiment with clipping masks and layer styles, and watch as your typographic designs come to life with a harmonious blend of text and imagery. With Photoshop CC and CS6 as your creative companions, the fusion of text and images becomes a testament to the boundless potential of digital design.


